Numbing Char-siuIsh Eggplants

This has been the MOST popular recipe on my Instagram feed - more than 100 saves of the post from 2021 and tested by many of my followers and connections. It still blows my mind! Originally developed with Trumpet Mushrooms to create a deeply flavorful vegan Chinese BBQ style dish at home, in later iterations I realized Eggplants are better suited to absorb that umami bomb marinade and transform magically when roasted or deep fried.

This has converted many eggplant haters and believe it or not when I served it at a dinner party to all my meat loving friends, they couldn’t tell it’s vegan?! So this LNY , I present you an easy side that might change your perspective about eggplants.


Ingredients (serves 4 as side)

1 lb Eggplants, cut into large 2-3” chunks (preferably Chinese or Japanese variety - easily found in produce section of Asian specialty markets)

Marinade

3 tbsp Hoisin Sauce (substitute with Oyster Sauce if you’re are not Vegan/Vegetarian or you have it on hand)

4 tbsp Dark Soy Sauce (substitute with Tamari or Coco Aminos to suit your dietary restrictions. You can use Light Soy Sauce as well , just increase it to 5 tbsp)

2 tsp Rice Wine Vinegar (substitute with white vinegar you have on hand, but do try to scout rice vinegar - it’s pretty great and versatile)

1.5 tsp Pomegranate Molasses (substitute with 1 tsp Maple Syrup and increase the rice wine vinegar to 3 tsp)

1.5 tsp Maple Syrup (extra 1 tbsp for glaze)

5-7g Fresh Ginger, peeled and grated

6-7 Garlic Cloves, minced

1 tsp Chinese Five Spice Powder

1-1.5 tsp ground Sichuan peppercorns (preferably green variety but the red ones are fantastic too)

1 tsp Gochugaru (substitute with red pepper flakes of your choice)

1-2 Star Anise, whole

Neutral Oil for cooking

Garnish

2 tbsp finely chopped Chives

2 tsp toasted Sesame Seeds

1/2 tsp Gochugaru (substitute with red pepper flakes of your choice)


Directions

🍆Salt eggplant chunks and let it sit on a colander for 20-25 mins (skip this if using Japanese/Chinese Eggplants). Meanwhile, whisk all marinade ingredients until smooth (don’t worry about the whole star anise , it’s for the most amazing aroma)

🍆Transfer drained eggplant chunks and marinade into a large ziplock bag. Make sure it’s sealed properly, shake well until eggplants look well coated. Let them marinate for at least 4 hrs or upto overnight. Soak up all the deliciousness!!

🍆 Fish out eggplant cubes and transfer marinade (alongwith the whole star anise) to a saucepan. At this stage, you can either bake or deep-fry the marinated eggplants - 

Baking: pre-heat oven to 425F, toss marinated eggplants in 2.5 tbsp Neutral Oil. Bake on a parchment lined sheet for 25 mins or until the outside is golden crisp and inside is soft. I recommend dividing into large sheets to avoid crowding in the oven

Deep fry: heat 200ml neutral oil. Once shimmering, fry eggplants for about 7-8 mins in three batches

🍆 Make glaze: add 1 tbsp maple syrup and about 1/4 cup (40ml) water into the saucepan with reserved marinade. Give it a good mix and cook on medium heat for 10-12 mins or until syrupy consistency

🍆Toss fried/baked eggplants in the sticky glaze so that everything is well coated. Transfer sticky golden eggplants to a serving platter and garnish. Chives and chile pepper. Enjoy!

Black Sesame Holiday Star Bread with Citrus Glaze

A fluffy tear & share bread with hot chocolate for breakfast is a special memory during Christmas holidays and I wanted to create something that would capture the spirit of Christmas along with my love for bread and that memory! A two-tone milk bread dough perfumed with cardamom and citrus zest. Filled with the sesame crunch butter and finished with a sweet aromatic glaze. It’s soft, nutty, aromatic, tangy and quite special…

I created this recipe for Rooted Fare ‘s Holiday Bakes contest however due to my nut allergy I couldn’t taste it, so obviously I made a simple sweetened sesame paste version and loved the contrast of slight bitterness from black sesame with the floral tang from both cardamom and the glaze. Making it again tomorrow!

*Note: you can totally skip the food coloring and make it as is and use a beaten large egg for the shine.


Prep time: 25-30 mins
Proving time: 75 mins 1st proof & 35 mins second proof
Bake time: 16-20 mins
Serves: 6-8

Ingredients
Dough

200g Bread Flour (I used King Arthur Brand)
40g Cake Flour (substitute with Plain Flour)
45g Instant Mashed Potato Flakes (I use the generic Idahoan Brand)
3g Fine Sea Salt
29g Milk Powder / Dried Milk
2 tsp Ground Cardamom
1/2 tbsp Meyer Lemon Zest (substitute with any citrus)
8g Instant Yeast
28g Granulated Sugar
205g Lukewarm Water
55g Salted Butter, softened
Tubes of Red & Green Gel Food Colors (either Wilton or Betty Crocker brand is fine)

*Note: don’t recommend using natural or artificial powdered food colors as they make the bread dry and the post bake color won’t be quite vibrant

Filling
120g Black Sesame Crunch Butter (Rooted Fare)
for a nut free alternative :
150g Toasted Black Sesame Seeds
2 tbsp Floral Honey or Agave Syrup
2 tbsp Salted Butter

For shine
2 tbsp Heavy Whipping Cream
2 tsp Maple Syrup

Citrus Glaze

1/2 tbsp Meyer Lemon Zest (substitute with any citrus)
1/2 tbsp Orange Juice + 1/2 tbsp Meyer Lemon Juice (substitute with any citrus)
110g powdered sugar


Directions

🌟 Make sesame paste: If going for the nut-free version then, using a food processor grind the toasted sesame seeds until they release oil and start forming into a coarse paste (about 5-6 mins in short bursts to avoid over heating). Then stir in honey and butter and run the processor for 1-2 mins until a smooth spreadable paste is achieved. Keep it refrigerated until 15 mins before spreading and assembling the loaf.

🌟 Make the dough: In the bowl of a stand mixer, combine all dough ingredients except butter & using dough hook attachment, knead on medium speed for 7-8 mins. Now gradually add butter bit by bit while the mixer is running. Continue kneading for about 15 mins until it’s turned into a smooth ball of dough. Divide equally into 2 portions (by weight), add several drops (adjust the quantity based on your brand) of red gel color to one and green to other. Knead the colors into each piece of dough until fully incorporated. Adjust the quantity of colors based on your desired shade of red & green. Transfer each dough into separate bowls, cover & let them rise until roughly doubled in size (about 75-90 mins)

🌟 Shaping: Divide each risen dough into 2 equal portions (2 red & 2 green). Roll each into balls, cover & let it rest for 10 mins. On a lightly oiled surface, roll out one red ball into a 25cm circle.  Transfer it onto a parchment lined baking sheet. Transfer 40g sesame crunch butter or the sesame paste (from Step 1) & using an offset spatula evenly spread filling leaving at least 0.5cm border. Now roll out the second red ball into same size & place it on top of filling covered disc. Repeat the layering process with filling & green dough discs - leaving the top green disc bare (*note: 40g filling in each layer)

🌟Shaping contd.: Place a 7.5cm circular guide (I use a cookie cutter) in the center & using a sharp knife or pizza cutter cut 16 equal strips through all layers. Pick up 2 adjacent strips & twist them away from each other 3 times then pinch the ends to form a pointy end. Repeat this for remaining strips so that you have an 8-point Star. Cover & let it rise until puffy, about 35-40 mins.

🌟 Baking: Pre-heat oven to 415F (or 205C) and whisk heavy cream & maple syrup until homogeneous. Brush the puffy loaf with the heavy-cream maple syrup mixture. Bake for 16-20 mins or until the center records 200F temp. Meanwhile, whisk the glaze ingredients and keep it aside.

🌟 Finishing: Transfer the loaf to a cooling rack & let it cool for few mins before brushing it with the citrus glaze. Let the glaze set for 15 mins before tearing and sharing! Highly recommend some good Oolong Tea to go with it

Noodle Soup of my dreams

It’s that time of the year. Chilly weather calls for heartwarming comforting meals. Soups, stews and several beige foods rule the roost of this genre. In my sincere attempt to liven up the dreary 4pm sunset Chicago winters I got into experimenting with lots of colorful toppings on a light flavorful broth. While doing that, I went down a rabbit hole of perfecting a vegetarian pho base which honestly was hard to find here in Chicago (so far I like Pho 888 in the Argyle area the most, if you are visiting then make sure to check them out. Their tofu banh mi is pretty rad IMO). I wouldn’t say I have succeeded but if I have to pick Noodle Soup of dreams then this it!!!!

Thick Rice Udon is served in a smoky spicy broth where charred alliums and toasted dry spices form the base and shiitake mushrooms add the Umami kick. Finished with fresh herbs, fried shimeji mushrooms, chiles, pickled cucumbers, lime and a dash of fiery (homemade) chili sauce.The broth is the real star here so feel free to switch up toppings and try with different noodles …but highly recommend try my way at least once.

Incredibly grateful to many many of my Instagram followers and friends for taking out time to test and share feedback in perfecting it! You all are the reason I’m still going…


Ingredients (serves 2 as Main)

For Charred base

1 medium Red Onion, quartered

10g Ginger, roughly cut in chunks

2 Scallion Whites, roughly cut in chunks

1 tbsp Dark Soy (1.5 tbsp if using Light Soy)

1 tsp Brown Sugar

2 tsp Neutral Oil

For spice mix

1 tbsp Coriander Seeds

1/2 stick of Cinnamon

1 Star Anise

4 Cloves

2 Black Cardamom Pods

1 tsp hot Red Pepper Flakes

1 tbsp Neutral Oil

3 Garlic Cloves, crushed

1 tbsp Dark Brown Sugar

5 lime leaves (substitute with 1 tbsp lime zest)

15g Dried Shiitake Mushrooms soaked in 250ml boiling water (reserve this please) for 20 mins then thinly sliced

600ml Vegetable Stock or Water - if not committed to keeping it vegan then feel free to use Chicken stock

2 tsp Mushroom/Chicken Bouillon (optional)

2 tbsp Dark Soy Sauce

1 tbsp Light Soy Sauce ( increase to 3.5 tbsp if not using dark soy)

420g cooked noodles of your choice, preferably thick rice noodles but regular Udon or Instant Ramen Noodles are fine too

Topping (all optional but highly recommended)

Reserved scallion greens, thinly sliced

7g Thai Basil, torn (substitute with a mix of cilantro and Italian sweet basil)

1/2 Chile (either Jalapeño or Fresno), thinly sliced

1 small Breakfast Radish thinly sliced into rounds and 1 Persian Cucumber sliced into matchsticks and pickled in 2 tbsp lime juice

Fried Shimeji Mushrooms, handful (optional)

Lime Wedges (an absolute must!)


Directions

🍜Turn the oven Broiler on HIGH. Toss all charred base ingredients in a small baking pan (should be snug). Put the pan under broiler for 10mins or until well charred. Once cool enough to handle finely chop everything and keep it aside. Reserve any leftover soy reduction

🍜Combine spice mix ingredients in a small pan, toast on medium flame for 2 mins or until very aromatic. Then using spice grinder / mortar pestle, whiz these toasted spices into fine powder

🍜In a deep bottom pan heat up oil,  then add chopped charred base ingredients. Sauté for 2 mins then add garlic and fry for a minute. Add ground spice mix and fry everything for 3-4 mins on medium flame

🍜Add sugar and fry for 2 more minutes. Add any leftover soy reduction from step-1, then add lime leaves (if using; don’t add zest at this point), both dark and light soy sauces. Cook for 1 min

🍜Now add mushrooms with soaking liquid, followed by stock. Bring it to boil then reduce the flame to let it simmer for about 18-20 mins

🍜Divide cooked noodles into two bowls. STRAIN and ladle broth into noodle bowls. Now finish with all toppings, add lime zest (if using), finish with a hearty squeeze of lime and slurp right away!

Fall Shakshouka

After Green, White & Red…. Here I am with a seasonal twist on my brunch staple Shakshouka - Poached Eggs on a Coconutty Orange and Butternut Squash Sauce with Sambal Vinaigrette and a delectable Curry Leaf Oil.

Half moon autumnal squash slices are braised in spices and orange juice until soft then thickened with coconut cream to form the base. Poached eggs are nestled in that rich aromatic sauce. Finished with a Sambal paste infused zingy vinaigrette for the acidity kick and Curry Leaf Mustard infused oil for the pizzazz. Tested and raved by many of my Instagram followers and friends, this one will soon become your fall favorite 🧡


Ingredients (serves 3-4 as Main)

Sauce

2.5 tbsp Coconut Oil (substitute with Olive Oil)

1 lb Butternut Squash, thinly sliced as half moons

1 Jalapeño, de-seeded and thinly sliced

4 scallions, julienned; whites and greens separated

3 garlic, finally chopped

1.5 tsp ground Cumin

1/2 tsp ground Cayenne 

1/2 tsp ground Turmeric

1 tsp Salt

1 tbsp Tomato Paste

150ml Fresh Orange Juice (increase the quantity if looking for a looser consistency)

75ml Coconut Cream (NOT coconut milk)

Sambal Vinaigrette

2 tbsp Fresh Orange Juice

1 tbsp Lime Juice

1/2 tbsp Lime Zest

1 tbsp Sambal Oelek (substitute with sriracha or your favorite hot sauce, but it won’t be the same)

1 tbsp Olive Oil

Curry Leaf Oil

1/2 tbsp Olive Oil

1 tsp Mustard Seeds (substitute with caraway or cumin seeds)

8-10 Curry Leaves (substitute with Basil)

4-5 eggs

*Fried Shallots (optional)


Directions

💥Whisk all vinaigrette ingredients until well emulsified. Keep it aside

💥Heat up coconut oil in a large skillet (I have cast iron here but nonstick or stainless steel are fine too); add jalapeño, scallion whites and garlic. Fry for 1 min, then add Butternut Squash, salt and spices. Stir everything until really so that the squashes look well coated. Continue frying on a medium flame for 15-16 mins or until it starts caramelizing and sticking to the pan

💥Now add tomato paste and cook for a minute. Then add half quantity of Orange Juice (to deglaze the pan) and continue cooking for 5 mins. Add coconut cream and give it a good mix. Tip remaining orange juice while stirring everything so that the base sauce looks relatively homogeneous. Add more juice at this stage for a looser consistency. Cook for 2 mins, then make 4-5 indentations in the Sauce

💥Crack Eggs into each cavity and generously mix the whites into sauce (use a fork to do that). Let them cook uncovered until whites are set (about 9 mins). Meanwhile, combine all curry leaf oil ingredients in a small pan.  On medium flame fry for 1 min to 90 seconds (until it starts sputtering)

💥Once the eggs are done - Drizzle curry leaf oil and scatter reserved scallion greens on top. Divide into serving bowls, spoon some vinaigrette on top and serve alongwith Flatbreads (Scallion Pancakes are my favorite with this) or Rice. Enjoy!

Quinoa CCC Cookies

This summer, I spent couple weeks with my parents in India and fortunately I celebrated Mother’s Day in-person after almost 12 years. Since I was around, I asked my Mum for any special requests and she immediately gave me a brief (pretty sure she has been thinking about this since I informed her my travel schedule) jotted down on a sticky note - create a sweet treat using Quinoa, Whole Wheat Flour, Jaggery and Chocolate. Phew! Someone has been watching Masterchef Mystery Box Challenges…

Based on the brief and incorporating my favorite coffee and cardamom flavor combo - I made these indulgent cookies that are hard to eat just one. The pops of quinoa, the aroma from cardamom and the melty chocolate and caramel bits make these delightful accompaniment with morning coffee… although I have seen my partner sneak a few while working late night! By using vegan butter and chocolate, you can totally keep it vegan and by using your go-to gluten free flour blend you can make it GF too!

*Note: CCC here stands for - Coffee, Caramel and Cardamom


Ingredients (about 25-26 medium or 17-18 large cookies)

Dry Ingredients
230g Whole Wheat Flour (spelt flour will be great too)
1.5 tsp Himalayan Pink Salt (or fine sea salt)
1/2 tsp Baking Powder
1/2 tsp Baking Soda
2 tsp Ground Cardamom

Wet Ingredients
115g Unsalted Butter, softened at room temperature (substitute with Vegan Butter)
95g Coconut Sugar or Light Brown Sugar (subsitute with 80g Jaggery and increase Caster Sugar by 15g)
50g Caster Sugar or Powdered Sugar (alternatively pulse granulated sugar in food processor for 30-60 seconds)
2 tbsp Flaxmeal (ground flaxseed) whisked with 5 tbsp Tepid Water and rested for 15-20 mins
2 tbsp Instant Coffee Powder/Granules
2 tsp Vanilla Bean Paste or Extract

Filling
175g Cooked Quinoa, at room temperature
75g Sea Salt Caramel Chips (substitute with White Chocolate Chips)
130g 60% Dark Chocolate Chips or Bittersweet Chocolate Chips


Directions
🍪 Whisk all dry ingredients in a medium bowl. In a large bowl, using electric whisk cream butter and both sugars until pale and a bit fluffy. Add coffee, vanilla and continue whisking until combined and fluffier - about 2 more minutes

🍪 Add half quantity of flax meal mixture and continue whisking until it’s combined and starts to look glossy and a bit voluminous. Add remaining mixture and whisk until everything is well combined. Now gradually sift and fold in half quantity of dry ingredients into the large bowl until no floury spots remain. Fold in remaining dry ingredients gently until a homogeneous dough is formed

🍪 Transfer all filling ingredients straight into the large bowl, gently fold and mix everything to form the cookie dough. Refrigerate for 30-40 mins and begin pre-heating oven to 195C/375F during that time. Line a large cookie sheet with parchment / oven safe silicone mat

🍪 Once chilled, using a medium or large size ice cream scoop portion out cookie dough on the lined sheet. Make sure to keep them at least 1/2” apart (optional - using wet hands feel free to smooth out the tops). Bake for 15-16 mins, transfer onto a cooling rack and devour in 3-4 mins while it’s still a bit warm. Store in an air-tight container at room temperature for upto a week. Or else refrigerate upto a month - just bake at 375F (straight from the fridge) for 5-7 mins before consuming.


Labneh Frosted Coconut Poppyseed Mini Cakes

Miniature pound cakes made with coconut flour, poppyseeds and copius amounts of citrus zest then topped with a Labneh (strained Greek Yoghurt) frosting swirled with an Orange Blossom & Star Anise syrup and finished with candied Orange slices. Rave reviews from friends, neighbors and my trusted recipe tester friend Minna (talented home chef from Espoo, Finland). Hope you give these a go!

*make sure to check out the notes below


Ingredients (makes 6)

Dry Ingredients

67g Plain Flour or All purpose Flour (use Gold Medal brand or any low protein% type)

50g Coconut Flour (substitute with Almond Flour or Plain Flour)

Heaping 1/4tsp Baking Powder

1/4 tsp fFine Sea Salt

15g Poppy Seeds

Wet Ingredients

117g Salted Butter, softened at room temperature

80g Granulated Sugar

37g Demerara Sugar (substitute with Coconut Sugar or Light Brown Sugar)

Zest of One Lemon - about 2 tbsp

Zest of One Orange - about 3 tbsp

1 tsp Orange Blossom Water (sub Vanilla)

2 large Eggs, beaten (100g)

Syrup

Juice of 1 Large Lemon (~ 10g)

Juice of 1 Orange (~ 90g)

75g Maple Syrup

2 tsp Orange Blossom Water (reduce to taste)

2 tbsp water

2 whole star anise, ground (optional, but recommended)

Frosting (makes extra)

200g Labneh, chilled

20g Double Cream or Heavy Whipping Cream, chilled

1 tsp Citrus Zest

4 tbsp Syrup, reserved

1/2 tsp Orange Blossom Water (optional)

3 candied Orange Discs, quartered


Directions

🍰 Pre-heat oven to 365F or 180C. Grease a set of 6 cupcake/muffin mold (I prefer silicone but regular metal is just fine). Now in a saucepan combine all syrup ingredients and bring to boil. Add candied orange pieces and simmer until it’s runny syrup like consistency (Should be reduced to half by weight). Transfer candied orange pieces on to a cooling rack and reserve 4 tbsp of syrup for frosting & keep the rest for serving

🍰 Whisk all frosting ingredients until well combined, smooth & glossy (I aim for soft-medium peaks). Refrigerate until ready to frost

🍰 Sift and combine dry ingredients in a medium bowl; keep it aside. Cream butter, sugar and zest until pale and fluffy. Add eggs and orange blossom then whisk for 3 mins or until combined (even if it looks a bit split that’s okay)

🍰 Fold in dry ingredients & mix until no dry floury spots. Divide and transfer the batter into greased molds, bake for 25 mins or until test skewer comes out clean. Once cooled, turn them out upside down. Slice off the domed bit of wider side so that it’s flat

🍰 Spoon generous blobs of frosting on the narrow side of each cake. Or for a fancier look, pipe the frosting on the wider side - like this. Then finish with a couple candied orange slices on top & drizzle the remaining syrup all over


*Notes:

  • You can use Gluten Free flour instead of Plain Flour to keep it Gluten free. I use Bob’s Red Mill Brand

  • If you’re skeptical about orange blossom, then just use vanilla extract or almond/orange extract. With Almond extract and Almond Flour, I bet these would turn into somthing quite special

  • In the batter you can use just orange or lemon zest instead of both

  • To convert these into cupcakes - poke holes into warm cakes & pour the cooled syrup right away. Pipe frosting with a slice of candied orange on top. Just make sure the cakes are hot & the syrup is cold while pouring

  • If left with extra frosting , then I highly recommend smearing on toast and top with fresh fruit

Spelt, Anise and Date Soda Bread

Even though I absolutely adore the breadmaking process sometimes the just the ease and speedy results of a Soda Bread is quite nice. From mis en place to freshly baked bread on table experience takes 45-50 mins with only active prep time of 15 mins. This version uses my favorite Spelt Flour and Old Fashioned Oats to bulk it up and give a nuttiness and the Date Syrup Butter although an optional accompaniment is the chef’s kiss! This one may not be a looker but the flavors are so special that with a mug of tea I’m sure you will begin your day with a smile.

*NOTE: can be made Gluten Free by using 280g of GF Plain Flour instead of Bread & Spelt flours here. Alongwith 1 tsp Xantham Gum. But remember the texture will be cakey


Ingredients (1 medium loaf)
Dry Ingredients
170g Bread Flour (more for dusting)
110g Spelt Flour (substitute with whole wheat flour)
60g Old Fashioned Oats
1.5 tsp Baking Soda
1/2 tsp Baking Powder
2 tsp Ground Fennel Seeds
1 tbsp Fennel Seeds
1 tsp Ground Cardamom (freshly ground preferred)

Wet Ingredients
60g Chopped Mejdool Dates (substitute with any dried Fruit of your choice like figs or apricots or even chopped candied orange peel)
150ml Cold Buttermilk (straight from the fridge)
125ml Cold Water
30g Date Syrup (substitute with Dark Molasses)

Date Syrup Butter (Optional)
114g OR 1 Stick of Salted Butter, softened at room temperature
2 tbsp Orange Zest
1/2 tsp Ground Cardamom
25g Date Syrup (more to drizzle on top)
2 tsp Toasted Sesame Seeds
Maldon Sea Salt


Directions
💥 Pre-heat oven to 425F. In a large bowl, combine and whisk all dry ingredients in a large bowl and make a well in the center. Combine and whisk all wet ingredients in a measuring jug or a tall coffee mug

💥 Transfer the wet mixture into the large bowl and using a spatula gently mix everything until everything is just combined (no floury spots). Now line a baking sheet with parchment paper and dust generously with bread flour.

💥 Transfer the dough mixture from the bowl to the floured parchment lined sheet (to avoid much handling you can transfer the dough into a parchment lined 8.5”x4.5” loaf tin, smooth the top, run a knife through lengthwise and sprinkle some oats and sesame seeds). Using floured hands and bench scraper (optional), roughly shape into an oval shape (it will be sticky but do not try to knead, just aim to put together). Sprinkle more flour on top to handle. Once a rough dough is formed, using kitchen shears make 3-4 deep crosses on top of the dough and bake for 30-32 mins until it’s baked. When knocked on the base makes a hollow sound (it’s imperative to bake right away after forming the dough as the chemical reaction between Baking Soda and Buttermilk starts instantly and you want to take advantage that by putting in the oven right away)

💥 While it’s baking, make the compound butter - whisk softened butter, orange zest, cardamom and date syrup until combined. Looks glossy, homogenous and smells aromatic (Optional Step). Transfer into a small bowl, drizzle some date syrup on top and finish with sesame seeds & flaky Maldon Sea Salt

💥 Let it cool for 15 mins at least before slicing. Once sliced, slather with some Date Syrup butter (if making) or plain softened salted butter and/or chutney/marmalade. Enjoy!

Cheesy Daikon, Chives and Caraway Flatbreads

In my opinion, recipe development can be equally daunting and effortless. There are times when I put in a lot of effort to come up with something very unique and it takes several rounds of testing to get to the desired vision and it misses the mark! And there are times when I just combine some of my favorite ingredient combos together and it’s perfect at one go - these ones belong to latter category. I have been in love with chives and caraway seeds flavor combo since forever and equally obsessed with spiking grated daikon with different spice blends but combining with a sharp melty cheese is what makes the whole thing quite different and memorable. First, I tried with a regular paratha style dough (replicate Mooli Paratha nostalgia) but in order to maintain the crispiness I had to sacrifice the filling quantity which I wasn’t willing to! Then I tried with my go-to mashed potato flatbread dough and it just hit the bull’s eye. With slight adaptation of the OG recipe, here I present you your new favorite Sunday Brunch.

*Note: by using dairy-free cheddar you can totally veganize this


Ingredients (makes 4)
Flatbread Dough
120g Plain Flour
142g Boiling Water
60g Whole Wheat Flour
24g Instant mashed potatoes flakes
3g Fine Sea Salt
2g Sugar
2 tbsp Neutral Oil (extra for finishing)
1.5 tsp Instant Yeast

Filling
350g Daikon, peeled and coarsely grated (feel free to substitute with carrots and follow the first step to remove moisture)

1 tsp Fine Sea Salt
1 Jalapeño, de-seeded & finely chopped
15g Chives, finely chopped
15g Cilantro including stems, finely chopped
2 tbsp Caraway Seeds
1 heaping tbsp Curry Powder
1 tsp Kashmiri Chili Powder (substitute with red pepper flakes or paprika)
100g Sharp Cheddar, coarsely grated

1-2 tbsp Fennel Seeds (I like heavily seeded but use your judgment)
1-2 tbsp Nigella Seeds


Directions

💥 Add 1/2 tsp salt to the grated Daikon, massage thoroughly and leave it for 15-20 mins. Then squeeze out all the water out - as much as possible. Critical step for removing moisture to achieve perfect results

💥 Make the dough - Combine first two ingredients in a large bowl and mix until a smooth paste or a roux is formed. Let it cool and come to room temperature (about 25 mins). Then combine rest of the ingredients and mix well. Once the flour paste is cool enough, transfer the yeast mixture into the large bowl. Mix everything well, it will be sticky but resist the urge to add any extra flour and rather use some extra oil to knead into a smooth bell of dough. Cover and let it rise for 90 mins

💥 Resting and Filling - Divide the dough into 4 equal pieces and roll into balls; cover with a wet towel and let it rest for 20 mins. Meanwhile prep the filling - in a medium bowl combine all filling ingredients, with remaining 1/2 tsp salt and mix gently until everything is well combined

💥Shaping and cooking - Pre-heat oven to 250F. Heat up a lightly oiled cast iron skillet on medium flame. Now roll out each ball into an 6” circle (keep remaining balls covered while working on one). Put 1/4 qty. of the filling in the middle, then bring the edges to the center to completely encase the filling, pinch and seal. Now gently roll it out into a 7-8” circle, don’t worry if theres any tearing or leakages. Sprinkle Fennel and Nigella seeds on top. Transfer the filled and rolled out dough disc onto the skillet, cook on high heat for 2-3 mins each side (no need to add any extra oil) - or until you observe puffing, brown splotches all over. Repeat the process for remaining 3 balls

💥 Serving - transfer the flatbreads on to a baking sheet and keep it warm in the pre-heated oven until ready to serve. These are very tasty as is but I like to serve with some tomato chutney or some some fresh pico di gallo. Enjoy!

Blood Orange Cardamom Semolina Cake

Middle eastern style syrup cakes are quite special in texture, flavors and fragrance - If you haven’t tried them yet, then you are missing out big time! I highly recommend seeking these out in traditional middle eastern bakeries or supermarkets - look for “Basbousa” or “Namoura”. My take here is an iteration of using the seasonal blood orange, crème fraîche and my favorite cardamom. It’s ultra tender, aromatic and a lovely make ahead dessert for a dinner party.

*Note: It’s nut-free and egg-free. By using Coconut Yoghurt instead of Crème Fraîche and Vegetable Oil instead of Ghee & Butter you can absolutely turn this into a stunning Vegan Dessert centerpiece.

Make sure to read the full recipe before starting as it involves resting time therefore plan your schedule accordingly


Ingredients (16 pieces)

Dry Ingredients

130g Coarse Semolina (mostly found in Indian or Middle Eastern Specialty Stores); Fine would work too but the resulting crumb will be tighter and dense

115g Coconut Flour or Ground Desiccated Coconut (Tap on the link for my preferred brand)

1/2 tbsp Ground Cardamom

50g Granulated Sugar rubbed with 1 tbsp Blood Orange Zest + 1 tbsp Lemon Zest

Wet Ingredients

30g Ghee, melted

56g Salted Butter, melted

1-2 tsp Orange Blossom Water (based on tolerance for the essence) - feel free to substitute with Vanilla Extract if opposed to floral notes

2 tbsp Blood Orange Juice

125g Crème Fraîche or Whole Milk Greek Yoghurt

1 1/4 tsp Baking Soda

Syrup

180g Granulated Sugar

1 tbsp Lemon Juice

2 tbsp Blood Orange Juice

110g Water

1 tsp Orange Blossom Water

4-5 Crushed Cardamom Pods

4-5 Lemon Peel Strips (optional)

2 tbsp Tahini for greasing

1 Blood Orange, thinly sliced and each slice quartered - for decoration


Directions

💥 Make the syrup - in a saucepan combine sugar, water, Cardamom pods and lemon peels (if using). Bring it to simmer and cook for 7-8 mins or until a thin/runny syrup consistency is achieved. Add lemon juice, orange juice and blossom water, mix thoroughly and turn off the heat. Let it cool completely.

💥 In a large bowl, combine all dry ingredients. Transfer orange juice, melted ghee and butter into the dry ingredients bowl. Mix really well and keep it aside. Now in a small bowl, combine crème fraîche / yoghurt with baking soda, mix thoroughly and let it sit for 15mins or until it looks frothy and increase in volume. Transfer this frothy mixture into the large bowl with Semolina mixture. Combine everything thoroughly and let it sit for 45-50 mins . Towards the end of resting time, pre-heat oven to 400F

💥 Grease a 8”x8” square pan generously with 2 tbsp Tahini. Transfer the rested batter into the greased pan, press it into an even layer (I use an oiled measuring cup to smooth out evenly). Using a sharp knife cut into 16 even squares then place a quarter slice of orange on each square. Bake for 15 mins , then reduce oven temperature to 375F and continue baking for another 15 mins or until it’s golden and cooked

💥 Take out from oven and pour the cooled syrup (make sure to fish out Cardamom pods before pouring) all over (it’s absolutely critical to keep the cake hot and syrup cool). Let it absorb and cool down completely. Then re-cut the squares, serve with crème fraîche or Greek Yoghurt and fresh blood orange segments.

Smoky Cauliflower Pepper Wraps

How do you all celebrate Valentines Day? Or you don’t? For us it’s usually cooking together interspersed with video games, online shopping, making our favorite cocktails & sometimes snowball fight (courtesy Chicago deep freeze). I call it cheesy capitalism way!

If you are looking to make something fun yet easy to put together then here I have - cauliflower florets and peppers are smothered in a Chile pepper concoction and roasted until super smoky with charred bits. Served on a creamy avocado sauce and finished with Sumac shallots and fresh mint. Once you try it, it’s quite addictive…


Ingredients (for 3-4 wraps depending on the size of the wrap bread)

Smoky Cauliflower

1/2 Medium Cauliflower Head, leaves removed and cut into 2-2.5” florets (roughly 150g)

1 medium green bell pepper, cut into 2” pieces (about 75g)

1 medium red bell pepper, cut into 2” pieces (about 80g)

2.5-3tbsp Neutral Oil

1.5 tbsp Harissa Paste

1 tbsp Tomato Paste

1 tbsp Apple Cider Vinegar

1 tsp Curry Powder

1 tsp Smoked Paprika

1 tsp Ground Ancho Chile (substitute with 1/2 tsp ground Chipotle or increase the quantity of smoked paprika and add 1/2 tsp Cayenne)

2 tsp ground Coriander seeds

1/2 tsp Ground Turmeric

1/2 tsp Fine Sea Salt (increase to taste)

Avocado Crema

1 medium Ripe Avocado, pitted & mashed

3 tbsp Vegan Yoghurt (substitute with Plain Greek Yoghurt, I prefer whole milk but you can use low fat or no-fat versions)

5g Fresh Mint Leaves

1 tsp dried Mint (optional)

1 tsp lemon zest

1 tbsp Lemon Juice

1/4 tsp Fine Sea Salt

Sumac Shallot

1 large Shallot, thinly sliced into rounds

2 tbsp Apple Cider Vinegar

Pinch of sugar

1-2 tsp Sumac

Fresh Mint leaves , torn


Directions

💥 Combine cauliflower florets and peppers in a large bowl. Whisk all other smoky cauliflower ingredients into a paste like mixture and transfer into the cast-iron skillet. Massage the vegetables with the mixture really well - make sure everything is well coated. Let it marinate for 30 mins to overnight (if doing for 30 minutes then I recommend directly mixing everything in the cast iron skillet or baking dish)

💥 Pre-heat oven to 450F. Meanwhile, whiz all Avocado crema ingredients in a food processor into a creamy paste. Adjust seasoning. In a small bowl, toss all Sumac Shallot ingredients and let it pickle for 20 mins at least.

💥 Bake the marinated cauliflower-peppers for 15 mins. Then increase the temperature to 485-500F (as high your oven can go). Give it a stir and continue baking for 12 more mins. After 27 mins, everything should be cooked through with charred splotches all over. Smelling smoky!

💥 Now take a tortilla, lavosh, pita or my sandwich wrap bread. Lightly toast the bread, spread some avocado crema, top it with smoky cauliflower-pepper mix, fresh mint and sumac shallot. Fold into a wrap and enjoy!

* If using lavosh or large tortilla - fold and wrap it like a burrito, lightly toast on a skillet. If using, pita then toast it lightly, slice into two to get two pockets. Spread the crema, stuff with cauliflower, peppers & Sumac shallot.

Winter Ratatouille

French summer classic gets a seasonal makeover. Here I have wintertime staples such as squashes, purple sweet potatoes, beetroot, carrots and apples - all thinly sliced and fanned out on a luxurious sauce that can be easily veganized. And the finishing touch of maple butter glaze with crispy herb is an absolute must. Whether it’s a special occasion or a dinner party this one will definitely get you all the “oohs” and “aahs” and the bonus is kids will love it too (as long as you don’t reveal the list of veggies).

I love to serve it with lightly toasted tortillas, so that everyone can dig in and make their own wrap with the ratatouille. And this Citrus Salad goes really well with this one.


Ingredients (serves 4-6 as side)

2 tbsp Salted butter (substitute with Olive Oil to keep it Vegan)
170g Leek Whites or the edible portion, thinly sliced
3 Garlic Cloves, chopped

1” Ginger Piece, peeled and grated
1/2 tsp Ground Allspice Berries (substitute with Ground Cinnamon)
1/2-3/4 tsp Ground Nutmeg (adjust to your taste / preference)
1/2 tsp Fine Sea Salt
2-3 Sprigs of Thyme
2 sprigs of Tarragon (substitute with Sage), discard stems and separate the leaves. Chop up the leaves coarsely
150ml Vegetable Stock (substitute with Water)
85g Crème Fraîche (substitute with Sour Cream or Vegan Cream Cheese)
25g Grated Gruyere or Cheddar Cheese (substitute with Vegan Cheddar)
1 tsp crushed White Pepper (black or pink pepper will work too)

Veggie Prep (everything should be thinly sliced into 3mm half moons)
2-3 Apples (preferably Pink Lady or Golden Delicious / Gala Varities)
2-3 Small Sweet Potatoes (Orange or Purple variety)
2 Medium Beets
1/2 of a Small Butternut Squash
1/2 of a Small Delicata Squash
1 + 1/2 tbsp Olive Oil
1/2 tsp Salt
2 sprigs of Thyme

Glaze
1.5 tbsp Unsalted Butter (substitute with Vegan Butter)
1 tsp Maple Syrup

1/2 tsp Apple Cider Vinegar
1/2 tsp Crushed White Pepper (black or pink pepper)
10-12 Fresh Tarragon or Sage Leaves


Directions

  1. Finish the Veggie Prep: Combine 1 tbsp Olive Oil (reserving 1/2 tbsp) with all veggie prep ingredients in a large bowl. Toss really well until everything is coated in oil, salt and thyme

  2. Make the sauce: In a 10” oven proof skillet (if you don’t have one then use a regular skillet and use a 10” Round baking tin later) add butter, leeks, ginger and garlic. On medium flame continue frying until they start sweating and smelling aromatic (about 4 mins or so). Then add dry spices and cook for 2 minutes; now add chopped tarragon leaves and stock. Give it a good mix and increase the heat to bring to vigorous simmer - once simmering cook it for 5 mins and turn off the heat. Pre-heat oven to 375F. Once cool enough, transfer into blender, add crème fraîche and cheese. Whiz until it’s a smooth sauce like consistency

  3. Arrange and bake: Transfer 3/4 sauce back to the oven-proof skillet or a round cake tin. Swirl the skillet/tin so that a layer is formed in the base then start arranging the seasoned slices of vegetables from the large bowl. I prefer to create a set of different colored slices (example: 1 slice of Apple, 1 slice of carrot, 1 slice of Delicata, 1 slice of Beet, 1 slice of Purple Sweet Potato and 1 slice of Butternut Squash), then repeat the pattern. Even if it’s haphazard it will still look fabulous due to the stunning natural colors of all vegetables. I try to stuff in a lot more vegetables as they shrink a lot while baking so don’t be afraid to squish and overlap. If there are leftover vegetables, then lay them over on a parchment lined baking sheet and bake them on a separate rack until golden and cooked. Those will be amazing for another dinner. Now, pour the remaining sauce on top of arranged vegetables finish with 1/2 tbsp Olive Oil and crushed white pepper. Cover with an aluminum foil and bake for 30 mins and uncover, increase the temperature to 400F and bake for another 20-25 mins or until the veggies look caramelized and when poked with a fork, they are tender

  4. Serve: When ready to serve, heat up butter in a small pan. Once sizzling, add tarragon or sage leaves. Fry until crisp, fish out the leaves and let the butter cool a bit. Now whisk, maple syrup and the aromatic butter into a glaze. Brush the ratatouille with the glaze and decorate with crispy tarragon or sage leaves. Enjoy!

*Note: if you have a cast iron Dutch oven or braiser with a lid then it will be perfect to use here

Crispy Taro Cake Bowl

Whether it was the influence of several friends and colleagues being Chinese, Vietnamese, Korean and Taiwanese or just my very deep-rooted love for the flavors from East Asia - we celebrate Lunar New Year every year. Other than making Nian Gao (the New Year cake) from scratch we do try to make most of the traditional dishes such as dumplings, hand-pulled noodles, pickled veggies, turnip and taro cakes. Along with some non-traditional ones such as Baozi or Gua Bao, Steamed Eggs, Rice Paper Rolls, Wontons, etc. The spirit of eating a lot of food with friends and family being intact!

For this year’s celebrations, I made this salad with leftover Taro Cake pieces and was a massive hit at the party! I made the cakes from scratch but you can find them in specialty stores such as H-mart or Park to Shop. If not then, substitute with Tteok or Tofu for similar textural delight or else go with boiled baby potatoes or cauliflower florets. Add some chopped up omelette or boiled eggs for extra richness. Gong Xi Fa Chai!


Ingredients (serves 2 as Main)

Vegetable Base

2 Persian Cucumbers, de-seeded and cut into 2” chunks. Salted and drained after 10 mins
2 Baby Carrots, thinly sliced into batons
1 Celery, cleaned & thinly sliced (optional)
1/2 Jalapeño, thinly sliced
1 small garlic, crushed
1 tsp Chili Oil (Homemade or Lao Gan Ma)
1 tsp light Soy Sauce (substitute with Tamari or Coco Aminos based on your dietary preferences)
1/2 tsp Granulated Sugar
1/2 tsp Doubanjiang or Fermented Broad Bean Paste(optional but highly recommended)

Sauce
2 tbsp Neutral Oil
4 Scallions, finely chopped (Handful greens Reserved)
4 garlic cloves, finely chopped
1 tsp Ground Coriander
1/2 tsp Chinese 5 spice powder

1 tsp Brown Sugar or Agave or Maple Syrup
1 tbsp Dark Soy Sauce (substitute with Tamari or Coco Aminos based on your dietary preferences)
2 tsp Black Vinegar (substitute with equal parts of Balsamic and any White Vinegar)

10-12 pieces of rectangular Taro Cakes, cooked (substitute with 100-120g sliced rice cakes/Tteok or soft tofu)

12g Cilantro, roughly chopped (substitute with basil)
1 tsp Black Roasted Sesame Seeds
1 tsp White Roasted Sesame Seeds


Directions
🧧 In a large bowl, combine all vegetable base ingredients and mix thoroughly. Keep it aside for 15-30 mins or while you prep rest.

🧧 In a non stick skillet - add oil, scallions, garlic and spices. Turn on heat on the lowest setting/flame. Fry the aromatics until they begin to color and become very aromatic (about 4-5 mins on low flame). Fish out the fried aromatics into a small bowl and increase the heat to medium.

🧧 Now gently fry the cooked Taro cakes or any of the substitutes until golden and crisp on both sides. Be patient for this step as it will take about 15-20 mins of attentive frying - but when you achieve that crisp exterior and jelly like soft n chewy interior it will be all worth it! If using rice cakes, then it will be much faster but keep an eye as it’s easy to over cook and make it rubbery. If using tofu, then gently coat with some cornstarch (about 1 tbsp). Adjust the timing if using Potatoes or Cauliflower. Once fried, transfer the Taro cakes to a paper towel lined plate to get off any excess oil

🧧 Now add rest of the sauce ingredients to the bowl with fried aromatics. Give it a good mix and transfer into the large bowl with vegetables. Transfer the crisp Taro cakes into the large bowl, add fresh cilantro, give everything a gentle mix and let the flavors meld for 15 mins

🧧 Divide into serving bowls, finish with roasted sesame seeds. Enjoy!

Baharat Mushroom Piccata

My vegetarian riff on a classic Italian Meat Dish - Shiitake and Oyster Mushrooms tossed and coated with Baharat & panko mix then fried until very crisp. Caramelized leeks, tarragon and garlic form the base to which chopped up marinated olives, lemon slices, white pepper and white wine are added. Then butter cubes are swirled in to finish an unctuous sauce. It was very aromatic, sprightly and an utter textural delight! Personally I like to serve with some wild rice or lightly spiced bulgur but I can’t think of reason why it won’t work on a Toast?!

*I have made the vegan and gluten free versions and they are wonderful; however I do think the flavor of dairy butter and soy sauce is quite unique and hard to replicate with substitutions. Unless you have intolerances or following a strict diet regimen I would recommend trying once as is to see what I mean

Ingredients (serves 2 as Main)

150g Fresh Shiitake Mushrooms, quartered 

150g Oyster Mushrooms, roughly torn

2 tsp Baharat Spice Blend (sub Shawarma spice blend)

1 tsp Light Soy Sauce (substitute with Tamari for Gluten Free)

1.5 tsp Cornstarch

2 tsp Panko Breadcrumbs (substitute with Rice Flour to keep it gluten free)

3 tbsp Avocado Oil (substitute with Olive Oil)

100g Leeks (only white & light green part), thinly sliced

15g Chives, finely chopped

1 small Thai Chile, chopped (optional)

2 garlic cloves, crushed

1 Meyer Lemon, 1/2 of it thinly sliced into 6-7 rounds & other half juiced (substitute with regular lemon)

25-30g Marinated Green Olives, pitted & roughly chopped

1.5 tsp Ground White Pepper (substitute with black pepper)

2 tbsp chopped Tarragon

1/2 tsp Fine Sea Salt

120ml Dry White Wine (substitute with vegetable stock to keep it alcohol free)

2.5 tbsp Unsalted Butter (substitute with vegan butter), cut into small cubes

Directions

🍄 In a large bowl, combine first six ingredients, mix well until mushrooms are lightly coated & spiced. Heat 2 tbsp oil in a large skillet, transfer coated mushrooms into skillet & fry on high heat until crisp & golden - about 8 minutes. Reserving any excess oil, keep the crisp mushrooms aside

🍄 In the same skillet, add 1 tbsp oil, leeks & Thai chile (if using). Fry on medium flame for 5 mins then add garlic and chives (reserving 1 tbsp chives for garnish). Continue frying for 3-4 mins. Now add olives, pepper, tarragon & salt, cook for a minute & add lemon slices. Cook for 30 seconds & add wine. Increase the flame to high & cook for 2-3 minutes

🍄 While it’s vigorously bubbling, add butter and continue swirling the pan constantly so that it’s well emulsified. Now transfer the crisp mushrooms & cook for a minute. Turn off heat

🍄 Finish with lemon juice and garnish with reserved chives. Enjoy!

Harissa Kabocha Squash Mascarpone Flatbread with Fixings

Don’t want to make dough from scratch but want to serve a party pleaser centerpiece that’s not charcuterie? I got you! Here’s an impressive flatbread utilizing generic store-bought pizza dough with fixings that add legit drama. The pizza dough come in quite handy for a dinner party or a busy workday lunch - amazing canvas to use up leftovers too.

I got my favorite kabocha squash - the texture is quite unique, and I usually use it in stews and making desserts but this season I have been hooked to roasting with harissa and employing as a pizza topping. Its quite delish and satiating.

The herb paste and pickled radish are an absolute must! I like to serve it with a Turkish Chile Pepper (Pul Biber) and grated garlic infused olive oil but feel free to serve with any chili oil that you like!


Ingredients (Serves 4)

1lb store bought Pizza dough (I used from Trader Joe’s)

Harissa Squash
350g Kabocha Squash, sliced into 1/8” thick half moons (substitute with any winter squash) - I like to keep the skin on for the texture but you can totally peel it off and bake
1/2 tbsp Tomato Paste
1-2 tbsp Harissa Paste (adjust based on the type and your spice tolerance - if using Mild variety then you can use upto 2 tbsp)
2 tbsp Neutral or Avocado Oil
1.5 tbsp Soy Sauce
1 tbsp Mirin

Fried Aromatics
1 trimmed Leek, only edible white & light green portion - sliced into 1/2” thick half moons
2-3 Small Breakfast Radish
4 garlic cloves, smashed and roughly chopped
2 tsp Neutral Oil
1 tsp Harissa Paste

Mascarpone Mix
110g Mascarpone, Room temp
50g Greek Yoghurt
1 tbsp dried Mint
1/2-1 tsp Salt
1 tsp Ground Black Pepper

Herb Paste

10-12g Mix of Fresh Cilantro and Mint leaves
20g Roasted Pumpkin Seeds
2 tbsp Lemon Juice
1 tbsp Lemon Zest (optional)
1.5 tbsp Chili Oil or Extra Virgin Olive Oil (for less heat)

Pickled Radish

4 Breakfast Radish, thinly sliced
2 tbsp Lemon Juice
Pinch of Sugar

1-2 tsp Olive Oil to finish (optional)


Directions
💥 Bring the pizza dough to room temperature. Oil a 13”x9” baking sheet, line with parchment and lightly grease with oil. With wet hands, transfer the pizza dough on to the sheet and fold one side of the dough to the middle and repeat with other side (think folding a paper into thirds). Now pinch the ends that meet in the middle and flip so that seam side is down and smooth side is up. Cover with an inverted tray or put in a large plastic bag to tie like a balloon and let it rise until it fills the pan completely (may take upto 3 hrs)

💥 Pre-heat oven to 420F and line a large baking sheet with parchment or aluminum foil. In a large bowl, combine all Harissa Squash ingredients and give it a good mix. All slices should be well slathered. Arrange the slices on the lined sheet and bake for 20-25 mins or until golden & cooked through. Increase the oven temp to 435F

💥 While squash is in the oven, heat up oil in a skillet and on low flame fry leeks and radish with garlic and harissa paste for 4-5 mins. Keep the fried aromatics on side. Combine and whisk all mascarpone mix ingredients into a smooth paste. In a small bowl, combine all pickled radish ingredients and leave it to pickle for 15-20 mins

💥Dimple the risen dough, spread the mascarpone mix on top, arrange Roasted squash wedges and scatter fried aromatics. Drizzle 1-2 tsp Olive Oil (optional) and bake for 25 mins or until golden with crisp bottom. Meanwhile, blitz all herb paste ingredients and keep it aside

💥 Plop spoonful of herb paste all over on the flatbread, scatter pickled radish and serve warm or room temperature. Enjoy!

Sambar Coconut Crêpes with Fixings

First things first - even if you think you are familiar with Indian cuisine and more or less understand the flavors, I can assure you that you are not there yet! As someone who spent 26 formative years in the sub-continent and have been exposed to a fair bit of several regional cooking, I know that I can barely scratch the surface of the rich and complex food the country offers. It’s quite encouraging to see, several up-and-coming Indian origin chefs and social media influencers are now focusing a lot more on branching out beyond Butter Chicken, Garlic Naan, Dal Makhni and Gulab Jamun. Now, I finally feel quite optimistic that we are at the cusp of the beginning of a new and exciting phase for Indian Food representation, yay!

So here I am, sharing a bit of nostalgia and food from my home state - Orissa (Odisha now!) where one of the most popular dishes is called Pitha - a family of breads, dumplings and pancakes mostly made of rice flour and usually steamed or fried. This particular dish is inspired by a specific variety called “Chitau Pitha” (quite similar to the “Neer Dosa” from Mangalore) - which traditionally has ground soaked rice, freshly grated coconut and a bit of ghee in the batter and served during breakfast either with a cauliflower potato stir fry or a sweet coconut relish. While growing up, I would ONLY eat these as roll-ups smothered with the fiery Gunpowder Spice blend supplied by our neighbor Auntie and stuffed with Green Beans…well I was an infamously picky eater with weird food habits! Thankfully most of them are corrected now. To celebrate that memory, I made these tender and fragrant savory crêpes filled with fresh herbs, jammy tomatoes, fried beans and pickled elements. I would highly encourage to scout for two specialty ingredients used here - Sambar Powder and Gunpowder/Milaga Podi in your local Indian Grocery Store, if unavailable then you can totally look on Amazon or make your own (tap the links shared in the recipe). These crêpes are quite versatile actually, feel free to use your favorite sauces, fried stuff… think taco fixings?! I hope you all like it as much as I do.


Ingredients (makes 8-10)
Batter
150g Rice Flour
20g Gluten Free Plain Flour (substitute with plain flour)
1 tsp Ground Turmeric
1 tbsp Sambar Powder (to make your own just Google and pick any of the top results)
1 tsp Fine Sea Salt
1 Can or 400g Coconut Cream (NOT same as Coconut Milk)
120g Water
1 large Egg OR 50g Aquafaba (reserved liquid from canned garbanzo or cannellini beans)

Green Beans
2 tsp Neutral Oil
1 Large Shallot, thinly sliced
2” Ginger, peeled and grated
2 tsp Mustard Seeds
10g Chives, finely chopped
300g Green Beans, de-stringed and sliced into thin 2.5-3” long pieces
1/4-1/2 tsp Salt (adjust to your taste)
1-1.5 tbsp Water

Jammy Tomatoes
250g Cherry Tomatoes, whole
1 Red Bell Pepper, diced
1/2 tsp Smoked Paprika
1/4 tsp Salt
1/2 tsp Sugar
1.5-2 tbsp Gunpowder Spice Blend (substitute with any savory Dukkah or your favorite spice blend)

Pickled Stuff
6 Breakfast Radish, thinly sliced into discs
1 small Shallot, thinly sliced
1/2 Red Fresno Chile, thinly sliced into rounds
2 tbsp Apple Cider Vinegar
1/4 tsp Sugar
1/4 tsp Salt

9-10g Fresh Cilantro, roughly chopped
8-9g Fresh Sweet Basil Leaves, roughly chopped


Directions
💥 Combine all pickled stuff ingredients in a small bowl and keep it aside for 20 mins or so. Now heat up a small 8-9” nonstick skillet, once very hot transfer tomatoes and begin charring them. Keep the pan moving to ensure they don’t stick. Once they start softening and blistering, add pepper and let everything char/cook for 1 minute. Turn off heat and transfer everything into a bowl, immediately add paprika, salt, sugar and gunpowder (spices must be added when hot). Give it a good mix and keep it aside

💥 Put all crêpe batter ingredients in a blender, pulse until smooth and loose consistency is achieved. Adjust water quantity to get to a thinnish crêpe like batter consistency. Let it rest for 25-30 mins. Meanwhile, heat up oil in the same skillet - add ginger, shallot and mustard seeds. Fry on medium flame for 2 mins, add green beans and continue frying for 4 mins. Add chives, salt and water, mix and cover. Let it cook on low flame for 3 more mins. Turn off heat and transfer and keep those beans aside (they should be cooked with a bite)

💥 Pre-heat oven to 200F. Wipe the skillet clean and put it back on heat (no oil needed, the fat in coconut cream is enough). Give a little whisk to the batter so that it de-settles and becomes homogenous again. On low-medium flame, ladle about 1/4 cup batter and swirl to cover the base (the edges will be thinner than center). Cook for 2-3 mins or until it’s set. Then flip and cook for another minute and gently slide onto a parchment lined baking sheet. Repeat this process to make about 8-10 crêpes and keep them warm in the oven until ready to serve

💥 Pick up a warm crêpe and stuff with some jammy tomatoes & fried green beans (refer to the image gallery). Top with pickled stuff and fresh herbs, roll up and enjoy!

Baharat Mushroom and Swiss Chard Hand Pies with Green Sauce

Even though I love making everything from scratch (lol!), but there are several occasions when I rely (rather prefer) on taking shortcuts and just buy. For example, the frozen Garlic Naans or Malabar Parathas from Trader Joe’s - they are as good as it gets so I have never really invested any time to make them from scratch. Similar story with good quality Puff Pastry - although I do feel the homemade one is better, (marginally though) the skill and effort required to get it anywhere close is a lot for an enthusiastic home chef. So, for untimely or timely pie cravings, here I have some posh little hand pies that come together quickly and hits the spot - especially if you are a pot pie lover! Baharat - the warm spice mix from the Middle East Region adds a wonderful depth to the umami notes from Mushrooms, vegetal earthiness from the chard and the creamy tang from yoghurt. If you can’t find it in your grocery store, then it’s quite easy to make your own blend at home - even though the ingredients vary across regions, here’s a fantastic blend that’s a good starting point and will quickly become your go to spice for marinades, soup & stew base, etc.

*Can be easily turned Vegan by following the substitution notes


Ingredients (makes 8-10)
18 oz or 520g Frozen Puff Pastry (I highly recommend all butter puff such Trader Joe’s or Dufour). To keep it Vegan, substitute with a vegan puff-pastry

Filling
335 Mixed Mushrooms of your choice, thinly sliced
2 tbsp Salted Butter (substitute with oil or vegan butter)
120g Red Onion, finely chopped
40g Scallions, finely chopped
4-5 garlic cloves, smashed & chopped
110g Swiss Chard, stems and leaves separated. Stems thinly sliced into bits
1 tsp Ground Coriander Seeds
1.5 tbsp Baharat Spice Mix
165g Greek Yoghurt (substitute with Vegan Yoghurt)
40g Water
1.5 tbsp Cornstarch / Cornflour
1-1.5 tsp crushed black pepper
1-1.5 tsp Salt
Sesame seeds (optional)

Egg Wash
1 large Egg, Beaten
1 tsp Maple Syrup
1 tsp Soy Sauce

*for vegan alternative whisk 4 tbsp Plant Based Milk + 1 tbsp Maple Syrup and a dash of Soy Sauce)

Sauce

25g Cilantro including stems, cleaned and roughly chopped
25g Garlic Chives (otherwise known as Chinese chives), roughly chopped (substitute with regular chives or scallions)
1/2 tsp Fine Sea Salt
1 tbsp Lime Zest
3 tbsp Lime Juice
2 tbsp Extra Virgin Olive Oil
5 tbsp Tahini
2 tbsp Water


Directions
🥧 Thaw the pastry overnight (move from freezer to fridge). Roll out each pastry sheet and cut into 8-10 equal rectangles (16-20 rectangles in total and each being roughly 10” x 8”). Arrange them on two lined baking sheets and refrigerate

🥧 In a deep bottomed pan, add butter, onions and scallions. Fry on medium flame for 5-6 mins or until translucent. Then add chopped chard stems & garlic, fry for 2 mins. Now add all mushrooms and fry for 5 mins or until they start releasing water and reducing in quantity

🥧 Whisk Yogurt, cornstarch and water to make a slurry. Add 3/4 of this slurry into the pan along with chard leaves. Cook for 2 mins then add remaining slurry. Mix everything really well and turn off the heat. Let it cool to Room temperature (the texture should be slightly pasty not liquidy at all - if it’s too wet then cook for 2-3 mins and let it cool again)

🥧 Pre-heat oven to 425F / 210C and bring out the pastry rectangles from fridge. Now spoon 2-3 tablespoons of filling in the middle of half of the rectangles (8-10 of those), cover it with another pastry rectangle. Press the two seams between fingers to seal the edges, then using the tip of a fork make indents to crimp and seal properly. Repeat this with remaining pastry rectangles to get 8-10 hand pies. Chill in the fridge for 10-15 mins

🥧 Whisk all egg wash ingredients & brush each pie with it. Sprinkle sesame seeds (if using), bake for 17-18 mins (may vary if using vegan pastry) or until very golden brown. While it’s baking, dump all sauce ingredients in a blender and blitz until a smooth sauce is achieved. Adjust seasoning and consistency with salt & water

🥧 Serve the pies along with sauce and a refreshing crunchy salad or the Slaw (in the picture). Enjoy!

Not So Humble Lentil Soup

In the Umami basics repertoire, here I’m adding a humble looking soup yet exploding with bold flavors. Lentil soups are quite hearty and versatile to whip up in no time. You can make a big batch for weeks and switch up different toppings to make it special every time. I love the yoghurt sauce in this as it not only adds a subtle creaminess but a pleasant tang that balances the overall dish. I use the magic formula of 1:3 (+1/2) solid to liquid ratio to get the right results, so feel free to use this ratio for other lentils to make this delectable heartwarming dish this winter!


Ingredients (serves 6)
200g Green or Brown Lentils, rinsed under cold water
100g Carrot, after peeled and cut into 2” pieces
900ml Water + 100ml extra
2.5 tbsp Ghee (substitute with oil of your choice to keep it vegan)
1 large Red Onion, finely chopped
6 garlic cloves, smashed
2 tsp Ground Turmeric
1.5 tsp Ground Cinnamon
2 tsp Ground Cumin Seeds
2 tsp Ground Coriander Seeds
1 tsp Ground Cardamom
2 tsp Ground Chile Pepper of your choice
2 tsp Ras-el-Hanout or Baharat spice blend (optional)
2 tsp brown sugar
2 tsp Fine Sea Salt (adjust to your taste)
2 tbsp Tomato Paste
15-20g finely chopped fresh Dill

Yoghurt Sauce
70g Greek Yoghurt (substitute with vegan yoghurt)
1 small garlic, grated
1 tbsp Lemon juice
2 tbsp finely chopped Dill leaves
Pinch of Fine Sea Salt
1/4 tsp ground black pepper

Finishing touches

Toasted Pumpkin Seeds or Nuts of your choice
Chili Oil or Chile Pepper Flakes
Sumac
Crackers, lightly crushed
Fried Onions


Directions
💥 Combine and whisk all yoghurt sauce ingredients. Keep it aside for serving

💥 In a large saucepan, combine water, 1tsp salt, 1 tsp turmeric & lentil. Turn on heat and cook on medium heat until it starts simmering vigorously. Now put on the lid and cook for 12 mins. Then add carrots, cover and cook on medium-high heat for 12 more mins. Turn off the heat and keep it aside

💥 In a large deep bottomed pan (think Dutch oven or wok), add ghee and onions. Turn on heat and on low flame, cook onions for 8-10 mins then add garlic with all dry spices, 1 tsp salt and sugar. Cook everything on low flame for 5 mins (keep an eye so that it doesn’t stick to the bottom much). Now add tomato paste, cook for a minute then add cooked lentils-carrots-water (everything from previous step). Mix well and continue cooking for 10 mins

💥 Turn off heat and using an immersion blender, blitz everything to your preferred texture. Add 100ml extra water, mix well and turn on heat - bring it to simmer while stirring. Adjust seasoning at this stage. Now ladle hot soup into serving bowls, drizzle yoghurt sauce, sprinkle fresh dill and any or all of the finishing touches. Enjoy!

Dark Chocolate, Chestnut and Whiskey Torte

Amidst the cookie marathons, gingerbread house decorations, organizing holiday parties and setting up the Christmas tree, phew! This holiday season the grown-ups deserve an indulgent dessert break to treat themselves. So, here I have a rich flourless chocolate torte enhanced with a bay leaf infused chestnut paste and spiked with a peaty Irish Whiskey, finished with the real MVP - Chestnut Chantilly Cream topping. If you don’t want to make chestnut paste from scratch, then you can absolutely use the store-bought versions - just make sure to look for sweetened ones. I would highly recommend using good quality whiskey for this recipe but if you want to keep it alcohol free then just use same quantity of Apple Cider+1 tsp Vanilla Bean Paste/Extract.


Ingredients (serves 5-6)

Chestnut Paste
250g Roasted & Peeled Chestnuts (I buy packaged ones from H-Mart)
160ml Whole Milk
100ml Double Cream Or Heavy Whipping Cream
40g Light Brown Sugar
20g Granulated Sugar
6-8 Bay Leaves
4 Star Anise Pods
1 tbsp Vanilla Extract or Bean Paste

Torte
125g Dark Chocolate, you can use chips or chopped up bar (I use 72% from Trader Joe’s)
125g Salted Butter
100g Chestnut Paste
70g Caster Sugar (fine Granulated sugar)
32g Whiskey (I used Connemara Peated Irish Whiskey, feel free to use your favorite whiskey. I love the smoky undertones so I think a good scotch will be fantastic)
2 large Eggs, separated
Pinch of Salt
1/2 tsp Ground Star Anise

Chestnut Chantilly
110g Chestnut Paste
22g Whiskey (I used Connemara Peated Irish Whiskey)
25g Powdered Sugar
120g Double or Heavy Whipping Cream, super cold (straight from the refrigerator)

Whiskey Syrup (optional but highly recommended)
3 tbsp Whiskey
2 tbsp Maple or Agave Syrup

Garnish

Rosemary Sprigs
Cocoa Powder


Directions
🎊 Make the Chestnut Paste - combine all ingredients in a saucepan, cook on medium heat and bring it to simmer. Simmer for 18-20 mins or until it’s thickened. Remove from heat and let it cool completely. Now, remove bay leaves and Star Anise pods and blitz everything in a food processor until very thick and smooth. To achieve a smoother texture, pass the paste through a mesh sieve using a wooden spatula (optional Step). We will need about 210g Chestnut Paste so if you end up with extra then feel free to use on toasts

🎊 Make Torte - pre-heat oven to 350F and line a 7” springfoam baking tin with parchment. Fill a saucepan with 2 cups of water, once barely simmering set up a large heatproof bowl on top and add chocolate and butter. Stir until chocolate has melted, take off the heat and add sugar and whiskey. Keep stirring until everything looks homogenous and shiny. While this is cooling - Beat egg yolks, salt, star anise and chestnut paste until smooth. Now gradually combine the chestnut paste-yolk mix into the chocolate whiskey mixture until everything is well combined. Whisk egg whites into fluffy stiff peaks, then in 2-3 batches gently fold them into the chocolates chestnut mix. Pour this into the prepared tin and bake for 26-28 mins or until just set. Let it cool completely then refrigerate until the Chantilly is ready

🎊 Make the Chantilly - combine and beat Chestnut paste, Whiskey and sugar until a smooth homogenous paste is achieved. Now whisk chilled heavy cream to medium to stiff peaks and using a silicone spatula carefully fold in the Chestnut mix. We are looking at a well incorporated dirty ivory colored thick luscious cream

🎊 Assembly and serving -
Mix whiskey and maple syrup well. Bring out the chilled torte and put dollops of Chantilly. Using a spatula spread evenly, feel free to make some waves! Decorate with rosemary and a dusting of cocoa powder. Slice and serve with a generous drizzle of whiskey syrup

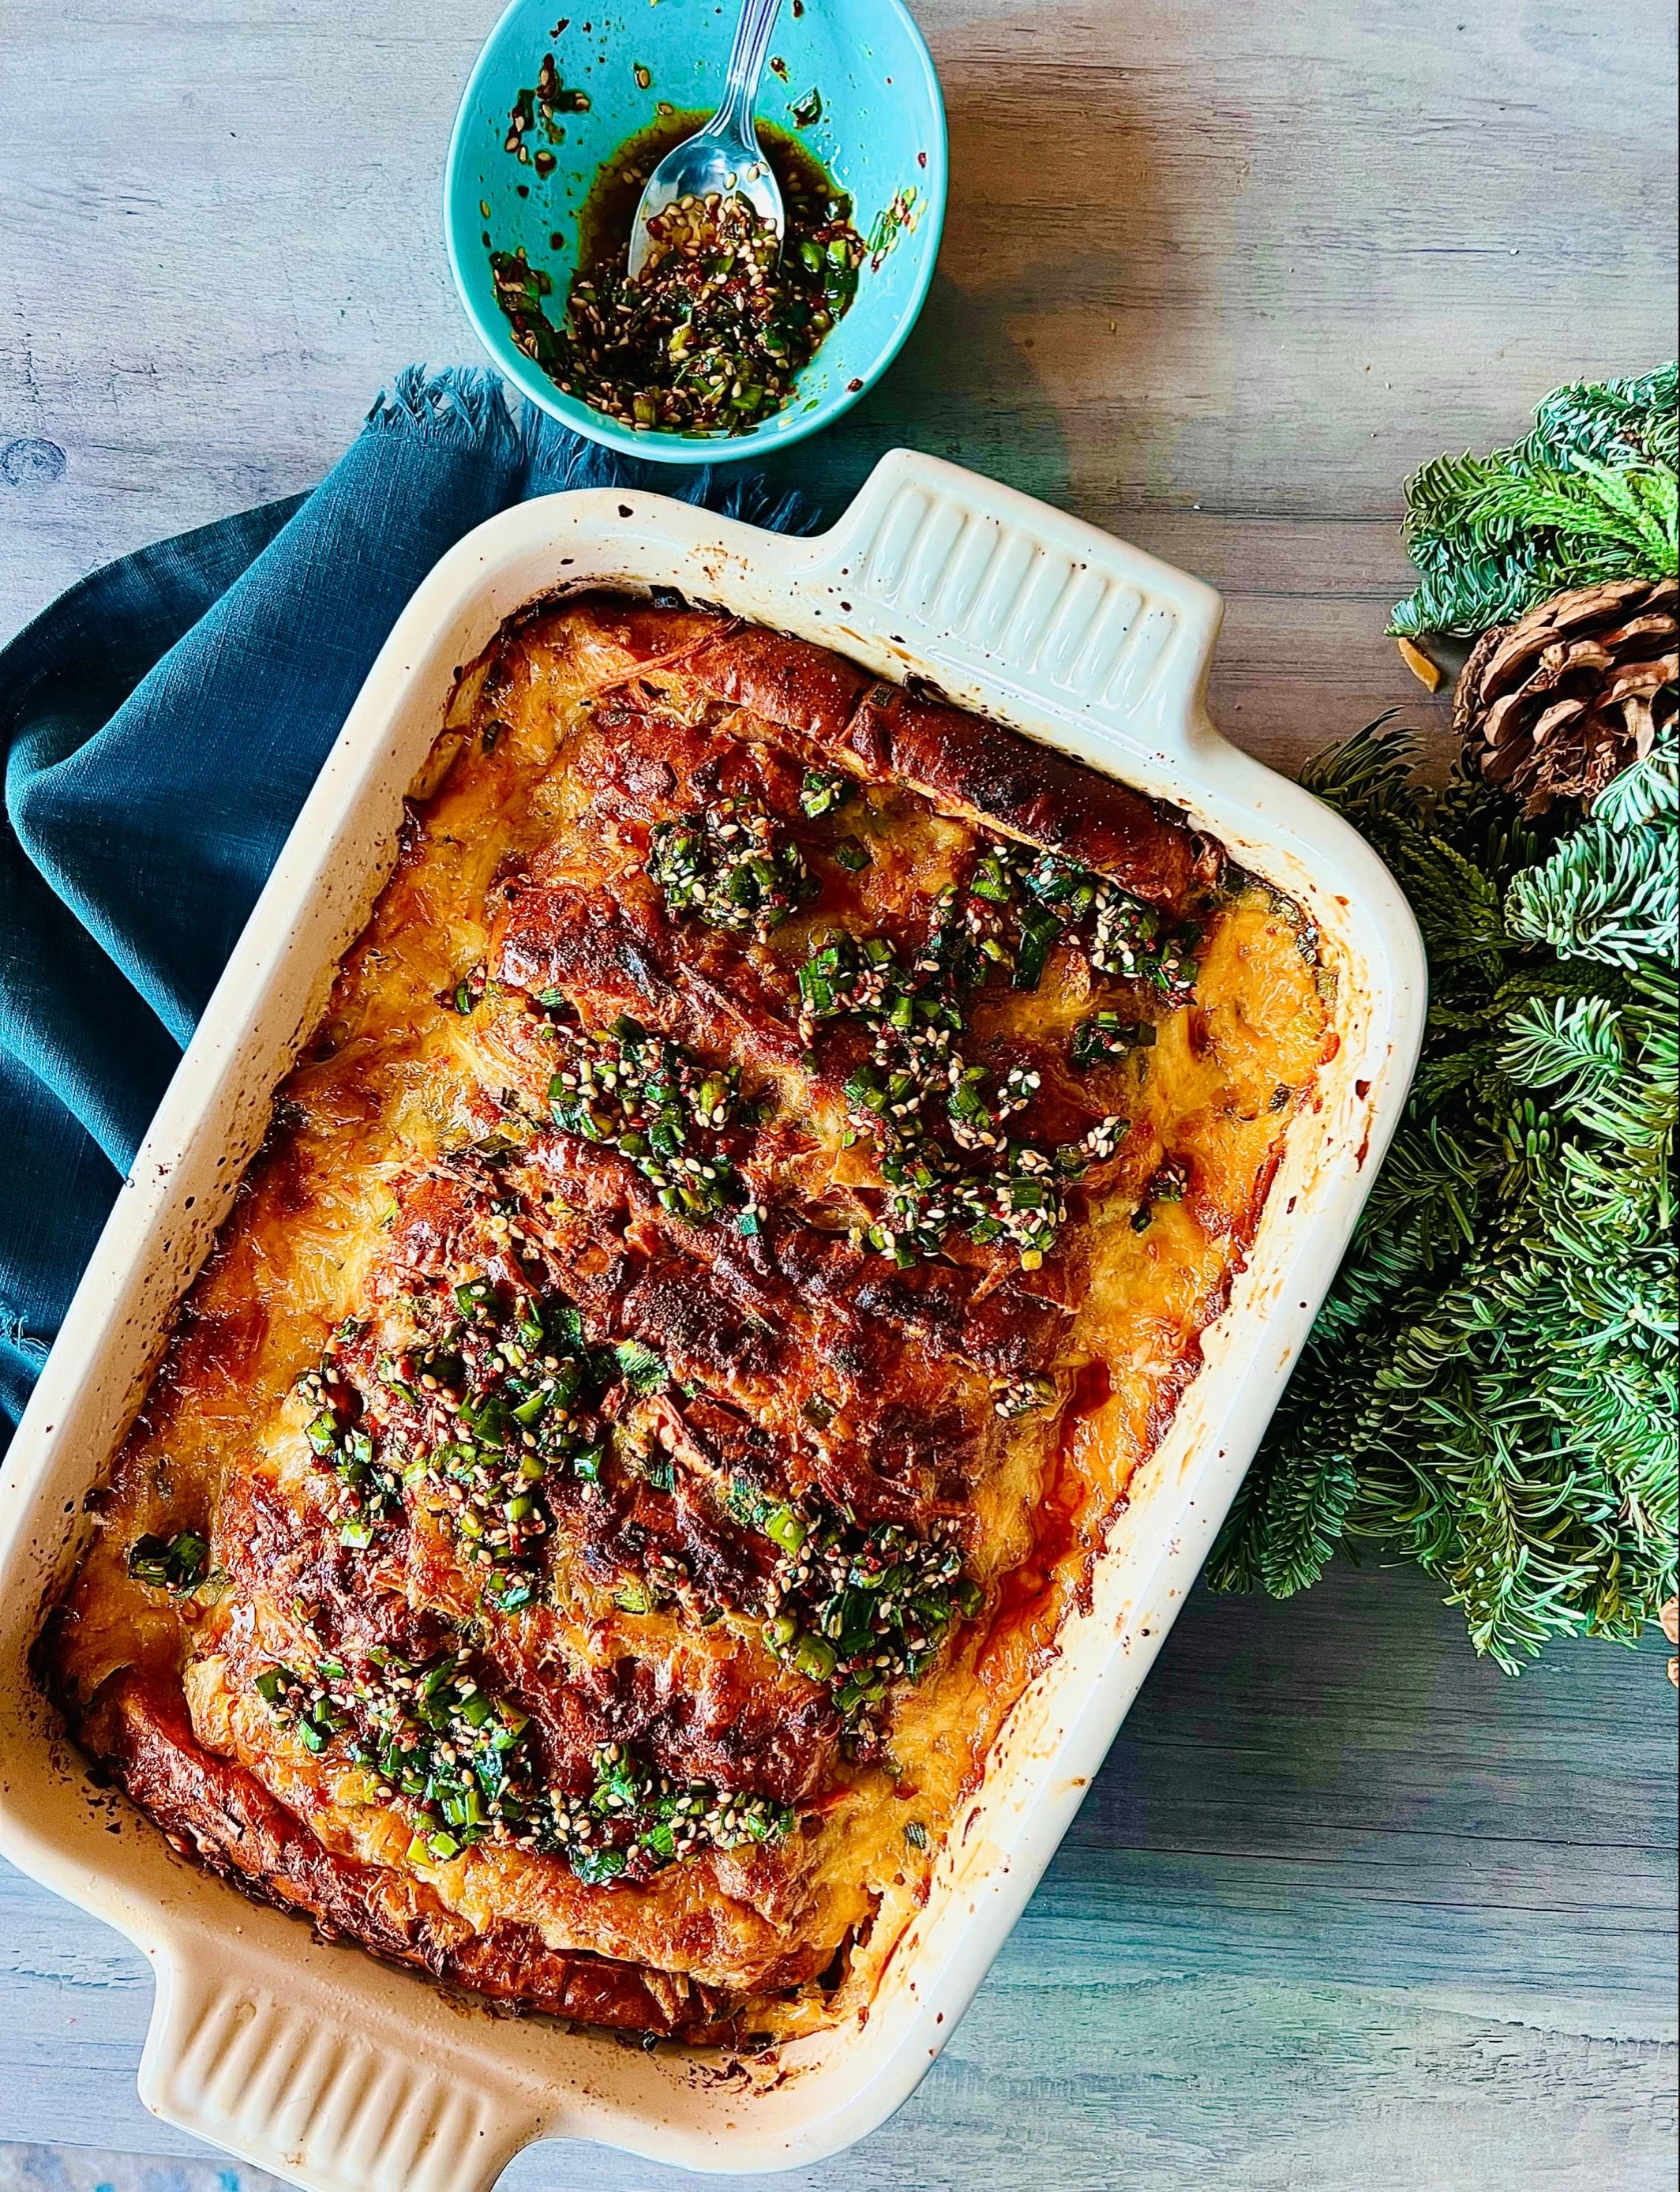
Kimchi Hotdog Strata with Chives Sesame Salsa

I’m here to convince you that Strata isn’t only for the Christmas Brunch but rather anytime you are confused about “what to bring to a potluck” or when you are thinking “how to ensure maximum fun and minimum cooking during holiday season”. It’s a one pot dish that has carbs, cheese and oven does all the cooking - ticks all the boxes for a crowd-pleaser! If you haven’t watched the famous Sarah Jessica Parker STRATA scene from the movie “The Family Stone” and still wondering what is this strata and what’s with the Christmas Brunch connection?? - it’s a savory take on classic Bread Pudding or a massive baked French Toast for a group. But as always here’s my unique take with an additional step of caramelizing veggies, including punchy Korean condiments such as Gochujang and Kimchi and using French Brioche Hotdog Buns. Whether it’s the Thanksgiving, Christmas or just a Family Dinner, I urge you to give this indulgent dish a go and win brownie points from all the guests (including kids - that’s right I have served this as is to 6-9 yr olds and they loved it).

*Feel free to use a combination of Gruyère and Cheddar instead of one variety; but DO NOT skip the additional brown sugar on top and the accompanying salsa!


Ingredients (serves 6)
455g Brioche Hot Dog Buns (I use the ones from Trader Joe’s)
2 tbsp Salted Butter, melted
60g Vegan Kimchi, roughly chopped (I use the one from H-Mart Kimchi Aisle)
1.5 tbsp Sesame oil (feel free to totally swap out for a neutral oil)
2 Medium Carrots, shredded (roughly 230-240g)
1 large Shallot, sliced

Custard
5 large eggs
4 tbsp chopped chives (I prefer Garlic Chives or Chinese Chives but Onion Ones are fine too)
2 tbsp Gochujang Paste (medium heat)
1 tbsp Chili Oil (Lao Gan Ma brand is always a good choice)
4 tbsp Kimchi Juice
1 tbsp Granulated Sugar
1 tsp Salt
473 ml Half & Half
200g Gruyère, Grated (substitute with Cheddar)
Topping
75g Gruyère, Grated (substitute with Cheddar)
2 tbsp Demerara Sugar (otherwise known as Raw Sugar)

Salsa
3 tbsp Chives, finely chopped
2 tbsp Dark Soy (sub Tamari)
1 tsp Rice Wine Vinegar
1.5 tsp Gochugaru
2 tsp Toasted Sesame Oil (I prefer the Korean variety found in H-Mart)
1/2 tsp Maple Syrup

1 tbsp melted butter to grease the pan

Directions
💥 Pre-heat oven to 350F. Brush hot dog buns with butter, arrange on a baking sheet & bake for 7-8 mins or until golden & well toasted. Keep them aside

💥 Fry shallot & carrots in sesame oil for 12-15 mins or until soft & caramelized. Combine it with kimchi & keep it aside

💥 Whisk all custard ingredients until frothy & well combined. Grease a 3-4 qt casserole dish with butter. Now fill each toasted bun with the kimchi carrot filling, arrange upright (cut side facing up, refer to the image gallery above) in a single layer & pour the custard. Then weigh down with a heavier dish and let soak for 2-3 hrs (feel free to refrigerate at this stage, no longer than 4 hrs though). Pre-heat oven to 400F

💥 Sprinkle Gruyère & Demerara sugar on top. Bake for 20 mins then increase the oven temp to 425F & bake for 15-16 mins or until deeply golden. While the pudding is cooling, whisk all salsa ingredients & keep it ready. Once ready to serve spoon the salsa on top & dig in!