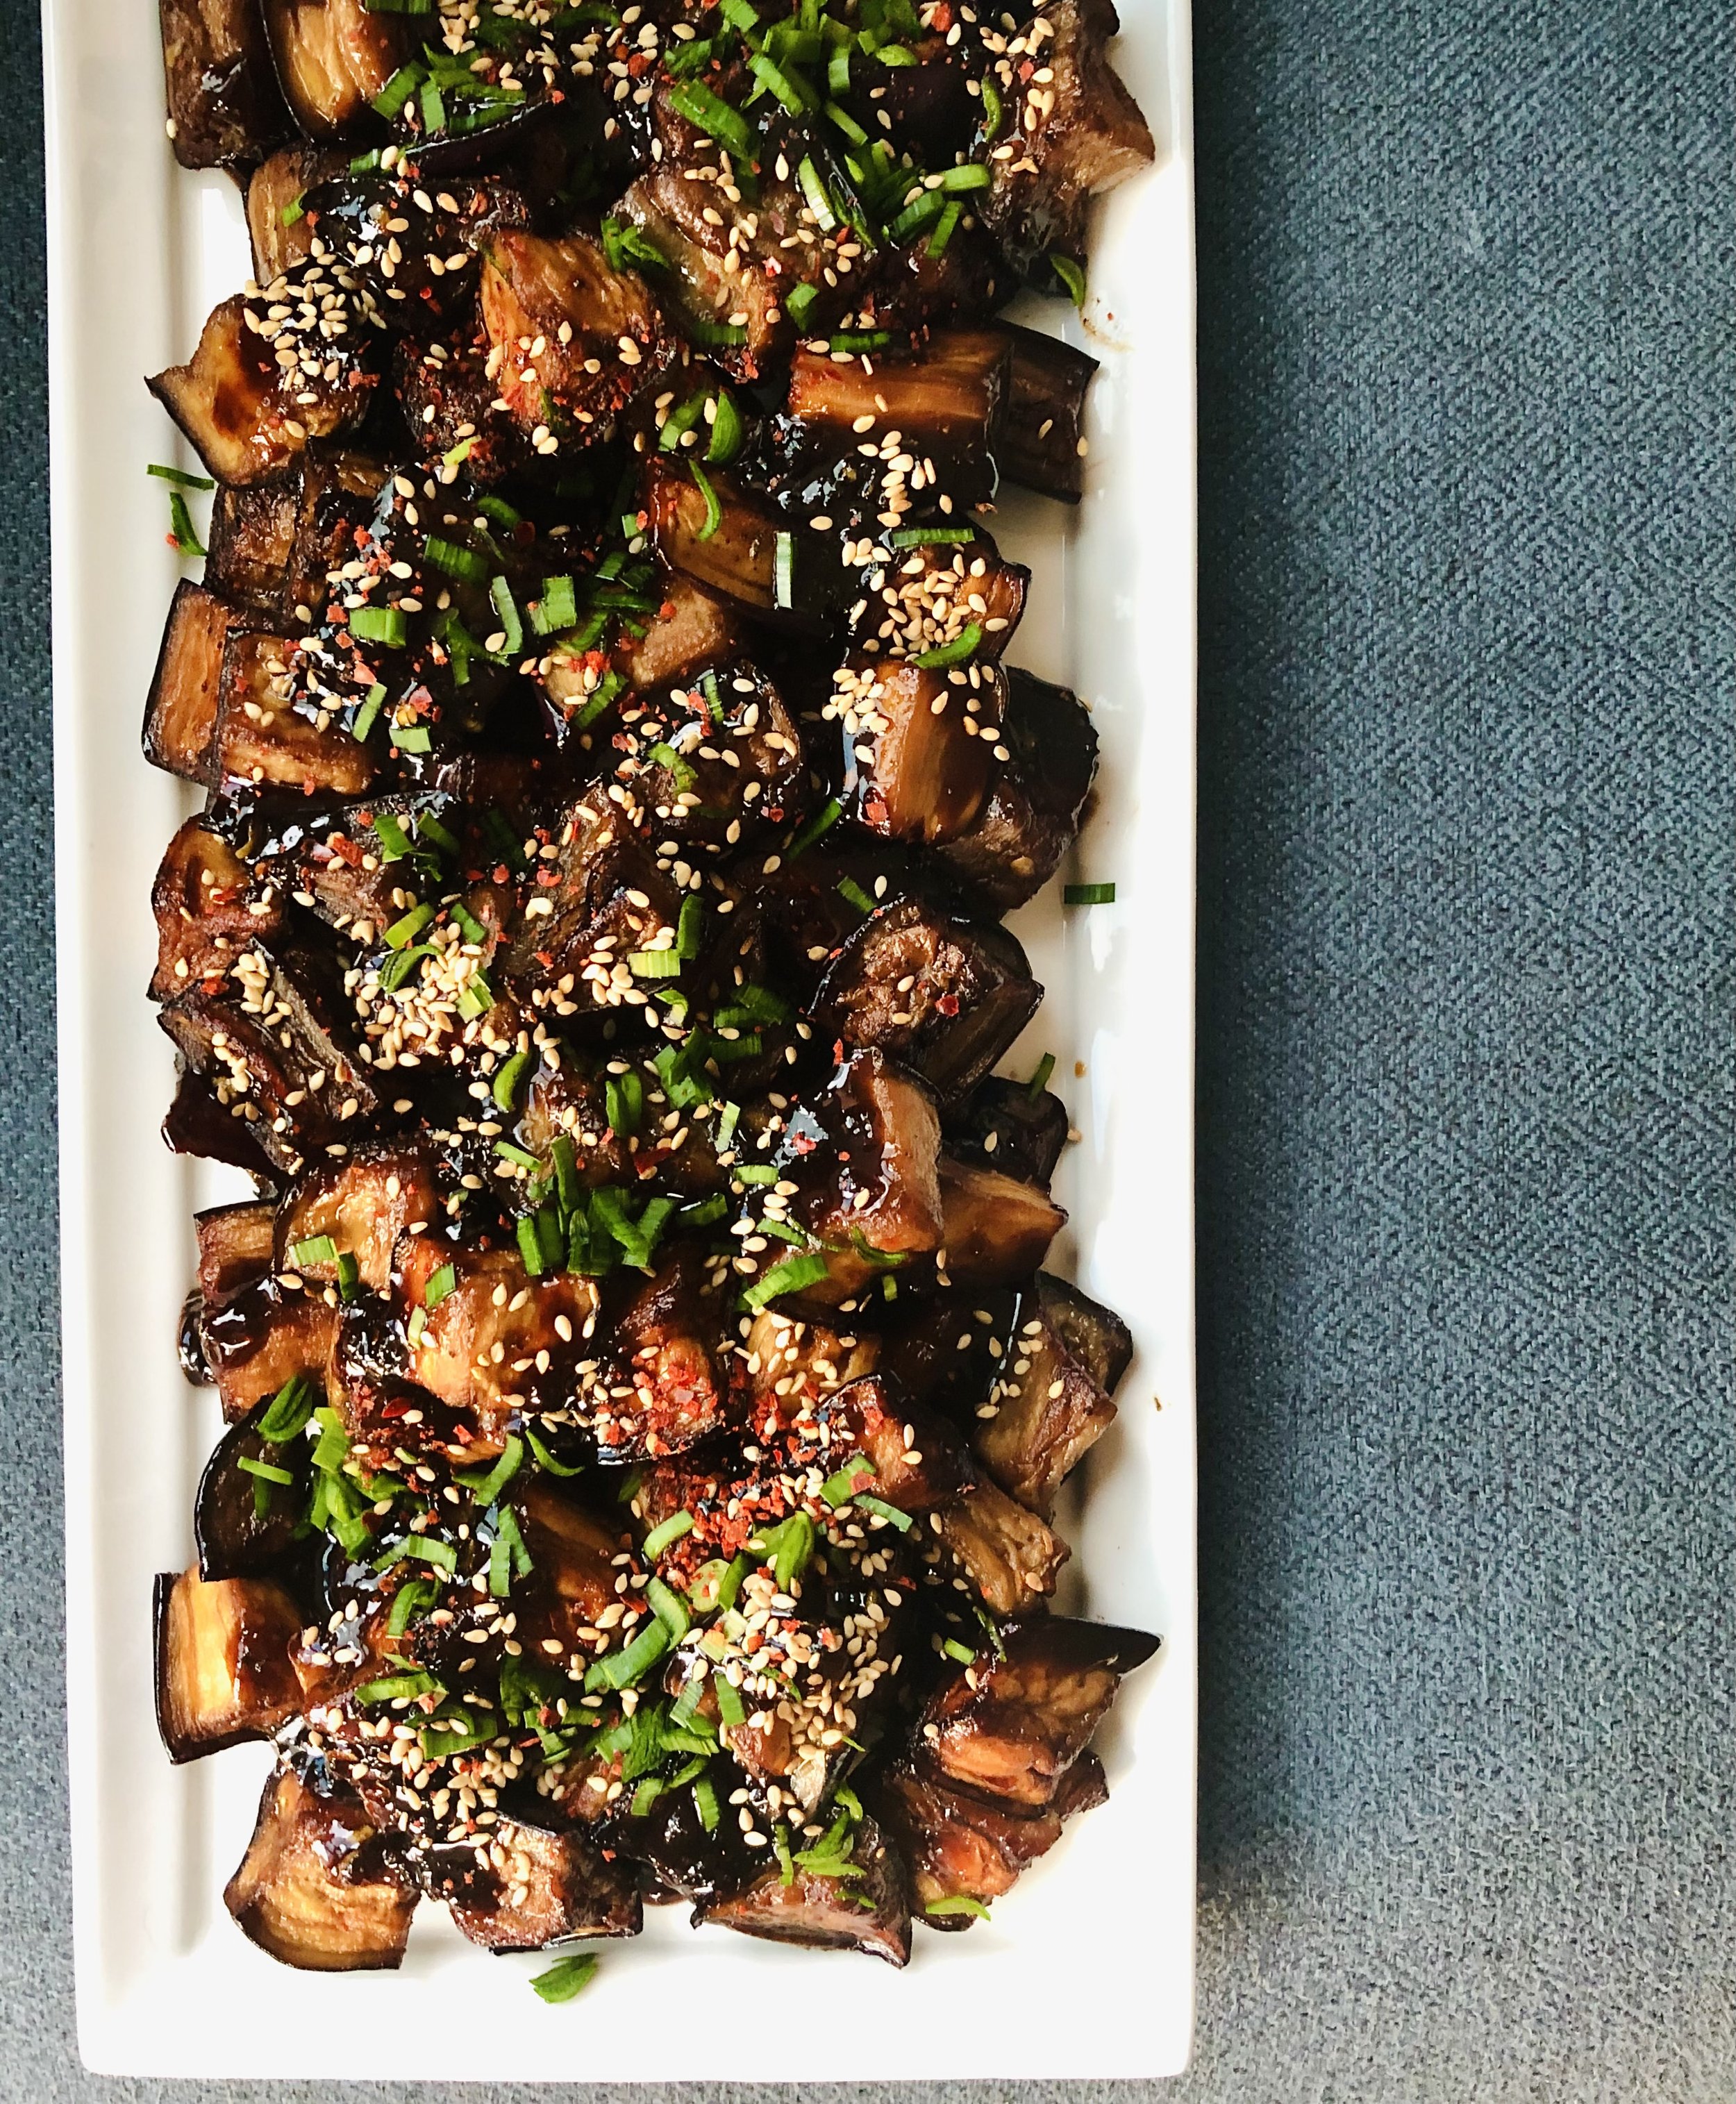
Numbing Char-siuIsh Eggplants

This has been the MOST popular recipe on my Instagram feed - more than 100 saves of the post from 2021 and tested by many of my followers and connections. It still blows my mind! Originally developed with Trumpet Mushrooms to create a deeply flavorful vegan Chinese BBQ style dish at home, in later iterations I realized Eggplants are better suited to absorb that umami bomb marinade and transform magically when roasted or deep fried.

This has converted many eggplant haters and believe it or not when I served it at a dinner party to all my meat loving friends, they couldn’t tell it’s vegan?! So this LNY , I present you an easy side that might change your perspective about eggplants.


Ingredients (serves 4 as side)

1 lb Eggplants, cut into large 2-3” chunks (preferably Chinese or Japanese variety - easily found in produce section of Asian specialty markets)

Marinade

3 tbsp Hoisin Sauce (substitute with Oyster Sauce if you’re are not Vegan/Vegetarian or you have it on hand)

4 tbsp Dark Soy Sauce (substitute with Tamari or Coco Aminos to suit your dietary restrictions. You can use Light Soy Sauce as well , just increase it to 5 tbsp)

2 tsp Rice Wine Vinegar (substitute with white vinegar you have on hand, but do try to scout rice vinegar - it’s pretty great and versatile)

1.5 tsp Pomegranate Molasses (substitute with 1 tsp Maple Syrup and increase the rice wine vinegar to 3 tsp)

1.5 tsp Maple Syrup (extra 1 tbsp for glaze)

5-7g Fresh Ginger, peeled and grated

6-7 Garlic Cloves, minced

1 tsp Chinese Five Spice Powder

1-1.5 tsp ground Sichuan peppercorns (preferably green variety but the red ones are fantastic too)

1 tsp Gochugaru (substitute with red pepper flakes of your choice)

1-2 Star Anise, whole

Neutral Oil for cooking

Garnish

2 tbsp finely chopped Chives

2 tsp toasted Sesame Seeds

1/2 tsp Gochugaru (substitute with red pepper flakes of your choice)


Directions

🍆Salt eggplant chunks and let it sit on a colander for 20-25 mins (skip this if using Japanese/Chinese Eggplants). Meanwhile, whisk all marinade ingredients until smooth (don’t worry about the whole star anise , it’s for the most amazing aroma)

🍆Transfer drained eggplant chunks and marinade into a large ziplock bag. Make sure it’s sealed properly, shake well until eggplants look well coated. Let them marinate for at least 4 hrs or upto overnight. Soak up all the deliciousness!!

🍆 Fish out eggplant cubes and transfer marinade (alongwith the whole star anise) to a saucepan. At this stage, you can either bake or deep-fry the marinated eggplants - 

Baking: pre-heat oven to 425F, toss marinated eggplants in 2.5 tbsp Neutral Oil. Bake on a parchment lined sheet for 25 mins or until the outside is golden crisp and inside is soft. I recommend dividing into large sheets to avoid crowding in the oven

Deep fry: heat 200ml neutral oil. Once shimmering, fry eggplants for about 7-8 mins in three batches

🍆 Make glaze: add 1 tbsp maple syrup and about 1/4 cup (40ml) water into the saucepan with reserved marinade. Give it a good mix and cook on medium heat for 10-12 mins or until syrupy consistency

🍆Toss fried/baked eggplants in the sticky glaze so that everything is well coated. Transfer sticky golden eggplants to a serving platter and garnish. Chives and chile pepper. Enjoy!

Noodle Soup of my dreams

It’s that time of the year. Chilly weather calls for heartwarming comforting meals. Soups, stews and several beige foods rule the roost of this genre. In my sincere attempt to liven up the dreary 4pm sunset Chicago winters I got into experimenting with lots of colorful toppings on a light flavorful broth. While doing that, I went down a rabbit hole of perfecting a vegetarian pho base which honestly was hard to find here in Chicago (so far I like Pho 888 in the Argyle area the most, if you are visiting then make sure to check them out. Their tofu banh mi is pretty rad IMO). I wouldn’t say I have succeeded but if I have to pick Noodle Soup of dreams then this it!!!!

Thick Rice Udon is served in a smoky spicy broth where charred alliums and toasted dry spices form the base and shiitake mushrooms add the Umami kick. Finished with fresh herbs, fried shimeji mushrooms, chiles, pickled cucumbers, lime and a dash of fiery (homemade) chili sauce.The broth is the real star here so feel free to switch up toppings and try with different noodles …but highly recommend try my way at least once.

Incredibly grateful to many many of my Instagram followers and friends for taking out time to test and share feedback in perfecting it! You all are the reason I’m still going…


Ingredients (serves 2 as Main)

For Charred base

1 medium Red Onion, quartered

10g Ginger, roughly cut in chunks

2 Scallion Whites, roughly cut in chunks

1 tbsp Dark Soy (1.5 tbsp if using Light Soy)

1 tsp Brown Sugar

2 tsp Neutral Oil

For spice mix

1 tbsp Coriander Seeds

1/2 stick of Cinnamon

1 Star Anise

4 Cloves

2 Black Cardamom Pods

1 tsp hot Red Pepper Flakes

1 tbsp Neutral Oil

3 Garlic Cloves, crushed

1 tbsp Dark Brown Sugar

5 lime leaves (substitute with 1 tbsp lime zest)

15g Dried Shiitake Mushrooms soaked in 250ml boiling water (reserve this please) for 20 mins then thinly sliced

600ml Vegetable Stock or Water - if not committed to keeping it vegan then feel free to use Chicken stock

2 tsp Mushroom/Chicken Bouillon (optional)

2 tbsp Dark Soy Sauce

1 tbsp Light Soy Sauce ( increase to 3.5 tbsp if not using dark soy)

420g cooked noodles of your choice, preferably thick rice noodles but regular Udon or Instant Ramen Noodles are fine too

Topping (all optional but highly recommended)

Reserved scallion greens, thinly sliced

7g Thai Basil, torn (substitute with a mix of cilantro and Italian sweet basil)

1/2 Chile (either Jalapeño or Fresno), thinly sliced

1 small Breakfast Radish thinly sliced into rounds and 1 Persian Cucumber sliced into matchsticks and pickled in 2 tbsp lime juice

Fried Shimeji Mushrooms, handful (optional)

Lime Wedges (an absolute must!)


Directions

🍜Turn the oven Broiler on HIGH. Toss all charred base ingredients in a small baking pan (should be snug). Put the pan under broiler for 10mins or until well charred. Once cool enough to handle finely chop everything and keep it aside. Reserve any leftover soy reduction

🍜Combine spice mix ingredients in a small pan, toast on medium flame for 2 mins or until very aromatic. Then using spice grinder / mortar pestle, whiz these toasted spices into fine powder

🍜In a deep bottom pan heat up oil,  then add chopped charred base ingredients. Sauté for 2 mins then add garlic and fry for a minute. Add ground spice mix and fry everything for 3-4 mins on medium flame

🍜Add sugar and fry for 2 more minutes. Add any leftover soy reduction from step-1, then add lime leaves (if using; don’t add zest at this point), both dark and light soy sauces. Cook for 1 min

🍜Now add mushrooms with soaking liquid, followed by stock. Bring it to boil then reduce the flame to let it simmer for about 18-20 mins

🍜Divide cooked noodles into two bowls. STRAIN and ladle broth into noodle bowls. Now finish with all toppings, add lime zest (if using), finish with a hearty squeeze of lime and slurp right away!

Blood Orange Cardamom Semolina Cake

Middle eastern style syrup cakes are quite special in texture, flavors and fragrance - If you haven’t tried them yet, then you are missing out big time! I highly recommend seeking these out in traditional middle eastern bakeries or supermarkets - look for “Basbousa” or “Namoura”. My take here is an iteration of using the seasonal blood orange, crème fraîche and my favorite cardamom. It’s ultra tender, aromatic and a lovely make ahead dessert for a dinner party.

*Note: It’s nut-free and egg-free. By using Coconut Yoghurt instead of Crème Fraîche and Vegetable Oil instead of Ghee & Butter you can absolutely turn this into a stunning Vegan Dessert centerpiece.

Make sure to read the full recipe before starting as it involves resting time therefore plan your schedule accordingly


Ingredients (16 pieces)

Dry Ingredients

130g Coarse Semolina (mostly found in Indian or Middle Eastern Specialty Stores); Fine would work too but the resulting crumb will be tighter and dense

115g Coconut Flour or Ground Desiccated Coconut (Tap on the link for my preferred brand)

1/2 tbsp Ground Cardamom

50g Granulated Sugar rubbed with 1 tbsp Blood Orange Zest + 1 tbsp Lemon Zest

Wet Ingredients

30g Ghee, melted

56g Salted Butter, melted

1-2 tsp Orange Blossom Water (based on tolerance for the essence) - feel free to substitute with Vanilla Extract if opposed to floral notes

2 tbsp Blood Orange Juice

125g Crème Fraîche or Whole Milk Greek Yoghurt

1 1/4 tsp Baking Soda

Syrup

180g Granulated Sugar

1 tbsp Lemon Juice

2 tbsp Blood Orange Juice

110g Water

1 tsp Orange Blossom Water

4-5 Crushed Cardamom Pods

4-5 Lemon Peel Strips (optional)

2 tbsp Tahini for greasing

1 Blood Orange, thinly sliced and each slice quartered - for decoration


Directions

💥 Make the syrup - in a saucepan combine sugar, water, Cardamom pods and lemon peels (if using). Bring it to simmer and cook for 7-8 mins or until a thin/runny syrup consistency is achieved. Add lemon juice, orange juice and blossom water, mix thoroughly and turn off the heat. Let it cool completely.

💥 In a large bowl, combine all dry ingredients. Transfer orange juice, melted ghee and butter into the dry ingredients bowl. Mix really well and keep it aside. Now in a small bowl, combine crème fraîche / yoghurt with baking soda, mix thoroughly and let it sit for 15mins or until it looks frothy and increase in volume. Transfer this frothy mixture into the large bowl with Semolina mixture. Combine everything thoroughly and let it sit for 45-50 mins . Towards the end of resting time, pre-heat oven to 400F

💥 Grease a 8”x8” square pan generously with 2 tbsp Tahini. Transfer the rested batter into the greased pan, press it into an even layer (I use an oiled measuring cup to smooth out evenly). Using a sharp knife cut into 16 even squares then place a quarter slice of orange on each square. Bake for 15 mins , then reduce oven temperature to 375F and continue baking for another 15 mins or until it’s golden and cooked

💥 Take out from oven and pour the cooled syrup (make sure to fish out Cardamom pods before pouring) all over (it’s absolutely critical to keep the cake hot and syrup cool). Let it absorb and cool down completely. Then re-cut the squares, serve with crème fraîche or Greek Yoghurt and fresh blood orange segments.

Smoky Cauliflower Pepper Wraps

How do you all celebrate Valentines Day? Or you don’t? For us it’s usually cooking together interspersed with video games, online shopping, making our favorite cocktails & sometimes snowball fight (courtesy Chicago deep freeze). I call it cheesy capitalism way!

If you are looking to make something fun yet easy to put together then here I have - cauliflower florets and peppers are smothered in a Chile pepper concoction and roasted until super smoky with charred bits. Served on a creamy avocado sauce and finished with Sumac shallots and fresh mint. Once you try it, it’s quite addictive…


Ingredients (for 3-4 wraps depending on the size of the wrap bread)

Smoky Cauliflower

1/2 Medium Cauliflower Head, leaves removed and cut into 2-2.5” florets (roughly 150g)

1 medium green bell pepper, cut into 2” pieces (about 75g)

1 medium red bell pepper, cut into 2” pieces (about 80g)

2.5-3tbsp Neutral Oil

1.5 tbsp Harissa Paste

1 tbsp Tomato Paste

1 tbsp Apple Cider Vinegar

1 tsp Curry Powder

1 tsp Smoked Paprika

1 tsp Ground Ancho Chile (substitute with 1/2 tsp ground Chipotle or increase the quantity of smoked paprika and add 1/2 tsp Cayenne)

2 tsp ground Coriander seeds

1/2 tsp Ground Turmeric

1/2 tsp Fine Sea Salt (increase to taste)

Avocado Crema

1 medium Ripe Avocado, pitted & mashed

3 tbsp Vegan Yoghurt (substitute with Plain Greek Yoghurt, I prefer whole milk but you can use low fat or no-fat versions)

5g Fresh Mint Leaves

1 tsp dried Mint (optional)

1 tsp lemon zest

1 tbsp Lemon Juice

1/4 tsp Fine Sea Salt

Sumac Shallot

1 large Shallot, thinly sliced into rounds

2 tbsp Apple Cider Vinegar

Pinch of sugar

1-2 tsp Sumac

Fresh Mint leaves , torn


Directions

💥 Combine cauliflower florets and peppers in a large bowl. Whisk all other smoky cauliflower ingredients into a paste like mixture and transfer into the cast-iron skillet. Massage the vegetables with the mixture really well - make sure everything is well coated. Let it marinate for 30 mins to overnight (if doing for 30 minutes then I recommend directly mixing everything in the cast iron skillet or baking dish)

💥 Pre-heat oven to 450F. Meanwhile, whiz all Avocado crema ingredients in a food processor into a creamy paste. Adjust seasoning. In a small bowl, toss all Sumac Shallot ingredients and let it pickle for 20 mins at least.

💥 Bake the marinated cauliflower-peppers for 15 mins. Then increase the temperature to 485-500F (as high your oven can go). Give it a stir and continue baking for 12 more mins. After 27 mins, everything should be cooked through with charred splotches all over. Smelling smoky!

💥 Now take a tortilla, lavosh, pita or my sandwich wrap bread. Lightly toast the bread, spread some avocado crema, top it with smoky cauliflower-pepper mix, fresh mint and sumac shallot. Fold into a wrap and enjoy!

* If using lavosh or large tortilla - fold and wrap it like a burrito, lightly toast on a skillet. If using, pita then toast it lightly, slice into two to get two pockets. Spread the crema, stuff with cauliflower, peppers & Sumac shallot.

Crispy Taro Cake Bowl

Whether it was the influence of several friends and colleagues being Chinese, Vietnamese, Korean and Taiwanese or just my very deep-rooted love for the flavors from East Asia - we celebrate Lunar New Year every year. Other than making Nian Gao (the New Year cake) from scratch we do try to make most of the traditional dishes such as dumplings, hand-pulled noodles, pickled veggies, turnip and taro cakes. Along with some non-traditional ones such as Baozi or Gua Bao, Steamed Eggs, Rice Paper Rolls, Wontons, etc. The spirit of eating a lot of food with friends and family being intact!

For this year’s celebrations, I made this salad with leftover Taro Cake pieces and was a massive hit at the party! I made the cakes from scratch but you can find them in specialty stores such as H-mart or Park to Shop. If not then, substitute with Tteok or Tofu for similar textural delight or else go with boiled baby potatoes or cauliflower florets. Add some chopped up omelette or boiled eggs for extra richness. Gong Xi Fa Chai!


Ingredients (serves 2 as Main)

Vegetable Base

2 Persian Cucumbers, de-seeded and cut into 2” chunks. Salted and drained after 10 mins
2 Baby Carrots, thinly sliced into batons
1 Celery, cleaned & thinly sliced (optional)
1/2 Jalapeño, thinly sliced
1 small garlic, crushed
1 tsp Chili Oil (Homemade or Lao Gan Ma)
1 tsp light Soy Sauce (substitute with Tamari or Coco Aminos based on your dietary preferences)
1/2 tsp Granulated Sugar
1/2 tsp Doubanjiang or Fermented Broad Bean Paste(optional but highly recommended)

Sauce
2 tbsp Neutral Oil
4 Scallions, finely chopped (Handful greens Reserved)
4 garlic cloves, finely chopped
1 tsp Ground Coriander
1/2 tsp Chinese 5 spice powder

1 tsp Brown Sugar or Agave or Maple Syrup
1 tbsp Dark Soy Sauce (substitute with Tamari or Coco Aminos based on your dietary preferences)
2 tsp Black Vinegar (substitute with equal parts of Balsamic and any White Vinegar)

10-12 pieces of rectangular Taro Cakes, cooked (substitute with 100-120g sliced rice cakes/Tteok or soft tofu)

12g Cilantro, roughly chopped (substitute with basil)
1 tsp Black Roasted Sesame Seeds
1 tsp White Roasted Sesame Seeds


Directions
🧧 In a large bowl, combine all vegetable base ingredients and mix thoroughly. Keep it aside for 15-30 mins or while you prep rest.

🧧 In a non stick skillet - add oil, scallions, garlic and spices. Turn on heat on the lowest setting/flame. Fry the aromatics until they begin to color and become very aromatic (about 4-5 mins on low flame). Fish out the fried aromatics into a small bowl and increase the heat to medium.

🧧 Now gently fry the cooked Taro cakes or any of the substitutes until golden and crisp on both sides. Be patient for this step as it will take about 15-20 mins of attentive frying - but when you achieve that crisp exterior and jelly like soft n chewy interior it will be all worth it! If using rice cakes, then it will be much faster but keep an eye as it’s easy to over cook and make it rubbery. If using tofu, then gently coat with some cornstarch (about 1 tbsp). Adjust the timing if using Potatoes or Cauliflower. Once fried, transfer the Taro cakes to a paper towel lined plate to get off any excess oil

🧧 Now add rest of the sauce ingredients to the bowl with fried aromatics. Give it a good mix and transfer into the large bowl with vegetables. Transfer the crisp Taro cakes into the large bowl, add fresh cilantro, give everything a gentle mix and let the flavors meld for 15 mins

🧧 Divide into serving bowls, finish with roasted sesame seeds. Enjoy!

Winter Special Dal

A red lentil, turmeric and coconut milk based dal packed with a punch from ginger, re-hydrated chiles and lime. Substantiated by spinach, cumin flavored fried sweet potatoes and finished with a sweet-spicy coconut topping (to which I also add a good measure of curry leaves, totally optional though). I came up with this as a quick and complete meal that stores well for busy weekday lunches. I was thrilled to see that so many of my followers loved this humble soup and have recreated it with squashes and pumpkin as well. Hope this winter you will find an opportunity to give this all time house favorite a go!

Ingredients (serves 4)

Sweet Potatoes

3 medium sweet potatoes, peeled and cut cross-wise into 1” discs (about 325g)

2 tbsp Olive Oil

1 tsp ground cumin

1/2 tsp ground cayenne (substitute with crushed black pepper)

1 tsp Brown Sugar

1/2 tsp Fine Sea Salt

Dal

2 tbsp Olive Oil

1 Shallot, coarsely chopped

2” Fresh Ginger, grated

1 tsp Cumin Seeds

1 tsp Ground Turmeric

1 tsp Fine Sea Salt

2 Small dried red chiles, finely, rehydrated and chopped

(feel free to substitute with 1.5 tsp red pepper flakes)

2 lemongrass stalks, tough parts removed and blitzed (optional)

96g Red Lentil, rinsed under cold water

400ml Coconut Milk (I prefer the Chaokoah brand)

500 ml Water

100g Baby Spinach

Zest and juice of 1 small lime

Garnish

1 tsp Olive Oil

55g grated coconut (thaw frozen ones available in Asian grocery stores.

I use the one from Deep brand found in all Indian Grocery Stores)

1 tbsp Maple Syrup or Agave Syrup

1 tsp Red pepper flakes

1/2 tsp Sea Salt


Directions:

🥣 Prepare the sweet potatoes - heat up oil in a skillet, add the potatoes spices, sugar & salt toss until well combined. Fry for 13-15 mins or until both sides are golden brown. Once ready, keep it aside

🥣 Now in a soup pot heat up oil then add shallot & ginger. On medium heat, sauté for 8-10 mins then add cumin seeds & sauté for 1 more minute. Add the spices, rehydrated chiles, lemongrass (if using) & continue to sauté for 2 mins

🥣 Add the lentils, coconut milk, water & salt (adjust seasoning if required), bring it to boil then simmer for 20 mins. While dal is simmering, in a small bowl combine all garnish ingredients and keep it aside

🥣 After 20 mins of simmering, add the sweet potatoes, spinach, zest & lime juice. Reduce heat & mix every thing well. Now, turn-off the heat after 2-3 minutes

🥣 In a small pan, heat up 1 tsp Oil and add the garnish & fry on high heat for 3-4 mins or until entering looks golden and sticky

🥣 Ladle the dal in a serving bowl, top it with the crunchy sweet-spicy coconut garnish. Serve with flatbread or jasmine rice & a couple wedges of lime

*Note: to rehydrate dried chilies - just place them in boiling water. Cover and let them soak for 15-20 mins

Blistered Green Beans with Garlicky Sesame Dressing

I’m a huge fan of green bean casseroles on Thanksgiving table, so obviously I had to bring in my umami game for my dream holiday spread! Loosely based on the classic Sichuan cooking style for Green Beans here I have blistered beans with fried garlic and chile infused soy-sesame oil dressing. A very few humble ingredients come together to make this ridiculously addictive side that I guarantee you won’t make just once!


Ingredients (serves 4-5 as a side)
1 lb Green Beans, de-stringed & whole
2 tbsp Sunflower Oil (sub any neutral oil)
Pinch of salt

Dressing
1.5 tbsp toasted sesame oil
12 Fat Garlic Cloves, whole & lightly crushed by blunt edge of knife
1 small Jalapeño (or Fresno), thinly sliced into discs
1.5 tbsp Soy Sauce (use Tamari to keep it GF & Coco Aminos to keep it Soy-free)
1 tsp Black Vinegar (even though it won’t be the same substitute 1/2 tsp Rice Vinegar + 1/2 tsp Balsamic Vinegar)
3 tbsp finely chopped Chinese Chives (substitute with 2 scallions)

1/2 tbsp Toasted Sesame seeds for garnish

Directions

💥Combine first 3 Dressing ingredients in a small pan. On medium flame, fry for 4 mins or until light golden. Turn-off heat, add soy sauce, chives & vinegar to the pan. Give everything a good mix & let it sit for 15-20 mins

💥Heat up sunflower oil in a large skillet, arrange all beans in a single layer (do it in batches if using small pan to avoid overcrowding). Let it cook on high heat for 3 mins UNDISTURBED. Now flip the beans, add salt & fry on medium-high flame for 4-5 mins. All should look blistered with brown spots & the texture will be slightly soft with a bite

💥Transfer beans into a large serving platter. Pour the dressing & toss until beans are well coated. Let the flavors meld for at least 10 mins

💥Scatter toasted sesame seeds on top & serve right away. I typically serve it with some steamed Jasmine Rice & Mapo Tofu!


Harissa Carrots and Garlic with Tahini Drizzle

Sticky & Sweet whole baby carrots and garlic cloves are smothered in a shalloty harissa oil; Glazed with pomegranate molasses & maple syrup concoction and finished with a spattering of lemony tahini sauce. The easiest seasonal side you will get hooked on to! You can find a quick video demo here


Ingredients (serves 4)
35ml Neutral Oil
1 lb Baby Rainbow Carrots - peeled & whole
8 garlic cloves, peeled & whole
2 shallots, finely chopped
1 tbsp Harissa (1.5 tbsp if using mild variety)
1 tsp ground cumin
1 tsp Salt
1 tbsp Tomato Paste
1.5 tbsp Maple Syrup + 1 tsp Pomegranate Molasses + 1/2 tbsp water - whisked well

Tahini Drizzle
3 tbsp Tahini
1 tbsp Lemon Juice
2 tbsp Water
Pinch of Salt

Garnish

1 tbsp of very finely chopped cilantro or chives
1 tsp roasted sesame seeds


Directions
🥕 Pre-heat oven to 415F. Bring a large pot of water to boil. When vigorously boiling, add whole baby carrots into that. Boil for 8-10 mins or until fork tender. Drain & keep it aside. Whisk all Tahini Drizzle ingredients

🥕 In a medium baking tin (we want everything to fit snugly) - add oil, shallots, garlic, Harissa, tomato paste & spices. Give everything a very good mix. Bake for 7 mins. Then add tender carrots, mix carefully so that carrots are well coated with spices. Now bake for 10 mins

🥕 Now add maple syrup & pomegranate mixture. Mix & broil for 4-5 mins. Until it looks & feels sticky

🥕 Transfer everything onto a lipped platter. Drizzle tahini mixture; garnish with chopped herbs & seeds

New York I Love You Ramen

Here I present you a meat-free Ramen that I have been working on for almost a year - Soy-Sesame-Miso Based Broth with a very special topping of blistered scallions, corn and Jammy cherry tomatoes tossed in a dressing. It’s a recipe that I’m incredibly PROUD of and may have shed happy tears over…

It’s my humble homage to three of my favorite shops in NY Mr Taka Ramen, Nishida Shoten and Ivan Ramen where I have spent hours to just get a spot, always returning happy & content! The eggs in the picture are completely optional, without those the dish is completely Vegan.


Ingredients (Serves 3-4)

250g Dry Ramen Noodles
3-4 Ramen Eggs
6 Roasted Nori Sheets (packaged)
2 tsp Toasted Black Sesame Seeds
Shichimi Togarashi (optional)

Dashi: combine everything & keep it aside for an hour. Discard mushrooms to repurpose for something else
Two 2” x 2” pieces of Kombu
10g Dried Shiitake Mushrooms
500ml warm water

Umami Sesame (toast everything for 2-3 mins and grind into fine powder)
1 tbsp white sesame seeds

1 tbsp White Sesame Seeds
2 tsp Chile Pepper Flakes
1 tsp Demerara Sugar (turbinado sugar, if not available then use light brown sugar)
1 tsp Sea Salt


Broth
1.5 tbsp toasted sesame oil
15g ginger, grated
5 garlic cloves, minced
1 scallion, finely chopped
Full qty. of Umami Sesame
1 tbsp tomato paste
1.5 tbsp Doubanjiang (Spicy Broad Bean Paste mostly used in Chinese cooking)
2 tbsp Soy Sauce
2 tbsp Mirin
2 tbsp White Miso
750ml Unsweetened Soy Milk, room temp (substitute with Oat or Sesame Milk)

Topping

3 scallions, cut into long 3cm pieces
55g steamed corn kernels
12 Cherry Tomatoes
1.5 tsp Toasted Sesame Oil
1 tbsp Dark Soy Sauce (1.5 tbsp Light Soy)
1 tsp Mirin


Directions
🍜 Make sure to prepare Dashi and Umami Sesame beforehand. Prepare the topping by heating up a nonstick skillet. Once smoking, add scallions and char for 2 mins then add corn and keep charring. Transfer both to a small bowl, now add tomatoes to the very hot skillet and char until each of them is bursting and jammy (about 6-7 mins). Now toss all of these charred toppings with rest of the ingredients and keep it aside

🍜 Now to make the broth - combine first 4 broth ingredients in a deep-bottomed pot and cook on medium flame for 4 mins. Then reduce the heat to low, add next 3 ingredients sequentially at 1 min interval and cook for 5 mins in total

🍜 Deglaze using soy sauce for 1 min then once soy is slightly absorbed into the base, deglaze using mirin for 1 more min. Now remove kombu sheets (it will be slimy) and transfer dashi into the pot. Once lightly simmering, add 1 tbsp miso by slowly dissolving it into the broth

🍜 Add soy milk and keep stirring while it cooks for 2 mins. Add remaining miso by slowly dissolving in the broth and turn off the heat

🍜 Now assemble the bowl - divide cooked noodles into bowls, ladle some broth, add the toppings with a ramen egg and Nori Sheets. Finish with some chopped scallion greens, sesame seeds and a dash of shichimi

Blistered Baby Carrots with Soy Butter, Lime and Shichimi

Sticky, sweet, salty and super smoky. These baby carrots definitely hit the Umami Jackpot! Friends from the US, if you haven’t yet discovered those Les Petit Carrots of Many Colors at Trader Joe’s then I urge you to run and pick up a bag stat! Hands down one of my top 5 TJ products. The technique of making the soy butter and pairing with lime can be used in other vegetables or even for Egg on Toast.

*I eat it with some sticky rice, roasted nori and silken tofu but feel free to stuff in a sandwich wrap or serve as a small plate in a dinner party spread.


Ingredients (serves 4 as a side)
1 lb Baby Carrots, whole & peeled
2.5 tbsp Vegan Butter (substitute with regular Unsalted Butter if not keeping vegan)
1 small garlic clove, grated or crushed
1 tbsp + 1 tsp Dark Soy Sauce (substitute Tamari or Coco Aminos)
1 tbsp Maple Syrup
1/2 tbsp Mirin
1.5 tsp Rice Wine Vinegar
Zest and juice of 1/2 Large Lime

1 tsp Shichimi Togarashi (substitute with 1/2 tsp chile flakes + 1/4 tsp+ toasted black sesame seeds + 1/2 tsp crushed toasted Nori)
1-2 tsp Roasted Sesame Seeds

1 tsp Finely chopped cilantro or scallion greens for garnish


Directions
🥕 Bring a large pot of water to boil, add carrots and let them boil/cook for 13-15 mins or until tender but firm enough to hold shape. Drain and keep it aside

🥕 Melt butter in a large skillet, then add garlic. Fry for 45 sec then add soy sauce, using a whisk or spatula keep stirring on medium or low heat so that it’s well emulsified. Immediately add carrots and turn off heat. Coat the carrots well with soy butter, then blow torch thoroughly so that it has black patches all over and very smoky. If not using blow torch then transfer into a baking dish and put it under grill / broiler for 2-4 mins while giving it shakes in every minute

🥕 Transfer the carrots onto a platter reserving the buttery juices. Now transfer those juices into a microwave safe bowl, add maple syrup, mirin, vinegar and lime juice into that. Give it a good whisk & microwave for 30-45 seconds and pour this concoction on top of the carrots.

🥕 Finish with lime zest, shichimi, sesame seeds & greens. Serve at room temp or straight away! Highly recommend alongside a sushi or soba noodle dinner spread.


Gochujang Glazed Radish

A quick & fun twist on the classic roasted root vegetables. Korean White Radish (조선무, Joseon-mu)) cubes are roasted until golden outside and tender inside. Then quickly tossed in a sweet & spicy Honey-Gochujang glaze, broiled for a sticky finish and garnished with sesame seeds & cilantro. Perfect for gluten intolerant or avoiding party guests!


Ingredients (serves 4 as Side)
1 lb Radish, cut into 16 large cubes -approximately 3 cm each (substitute with Turnips and adjust the baking time accordingly - upto 35-40 mins)
1.5 tbsp Vegetable Oil
1/2 tsp Salt
1/4 tsp Sugar

Glaze

1 tbsp Gochujang Paste (I prefer the hot variety from Haechandle Brand)
1.5 tbsp Tamari (substitute with Coco Aminos to keep it Soy free)
1 small garlic clove, grated
1 tbsp Mirin
1/2 tsp Honey (sub Maple Syrup to keep it vegan)
1 tsp Rice Wine Vinegar
2 tsp water

Garnish
1.5 tsp roasted sesame seeds
1 tbsp chopped cilantro (substitute with chives)

Directions
💥Pre-heat oven to 400F. In a high sided baking pan combine first 4 ingredients. Give it a good mix, tightly cover with aluminum foil & bake for 20-22 mins . Then increase oven temp to 425F, uncover & bake for additional 17 mins or until light golden in color & fork-tender in texture

💥Meanwhile combine all glaze ingredients & microwave for 20 seconds. Pour this on the baked Radish. Give a good mix so that every Radish piece is well coated. Broil (put it under the Grill) on high setting for 4-5 mins

💥Garnish with toasted sesame seeds & cilantro. Serve at room temperature


Silken Tofu Citrus Celebration Salad

A dish that celebrates the citrus season and my love for silken tofu with sesame oil - charred peppers and cherry tomatoes are mixed with a flash fried ginger scallion numbing oil, which is further intensified with blood orange zest and juice, soy, vinegar, Shaoxing cooking wine and toasted sesame oil. Silken tofu and citrus wheels are arranged in a platter then this smoky sweet aromatic dressing is poured all over. Finished with toasted sesame seeds, flaky salt and scallion greens. It tastes better over time and can be kept in the fridge up to 3 days.


Ingredients (serves 4 as a side)

14oz or 400g Silken Tofu, cut into roughly 2” x 4” rectangles

3 Blood Oranges (substitute with 2 Navel or Cara Cara Oranges), peeled and cut into 1/2” thick discs

5-6 Mini Sweet Peppers, whole

12-14 Cherry Tomatoes, whole

Dressing

2 tbsp Fresh Ginger, grated

1 Scallion, white portion - finely chopped and green portion sliced at an angle (reserved for garnish)

1 tsp Ground Sichuan Peppercorns (I use a mix of red and green , feel free to use whatever is available)

1.5 tsp Chile Flakes (feel free to use your go to hot pepper flakes)

2 tsp Roasted Sesame Seeds

2 tbsp Vegetable oil, shimmering hot

2 tsp Red Wine Vinegar

1 tbsp Shaoxing Cooking Wine

3 tbsp Blood Orange Juice (substitute with fresh Orange Juice)

2 tbsp Dark Soy

1/2 tbsp Maple Syrup

1 tsp Toasted Sesame Oil

Garnish

1 tsp roasted sesame seeds

1 tsp toasted sesame oil

1/2 tsp Flaky Salt

Directions

🥗 Heat up a skillet, once smoking add peppers to it, using tongs begin the charring process. After 8 mins, add tomatoes into the skillet & continue charring everything until blistereded and soft. About 15 mins total. Once cool enough to handle, chop up the peppers and leave the bursting tomatoes as is

🥗 Combine first 5 Dressing ingredients in a heatproof bowl, pour the hot oil into it, give everything a good mix (it should making a hissing noise). After 1 min add remaining dressing ingredients, followed by chopped peppers & tomatoes. Give everything a good mix and let it marinate for 45 mins at least or upto overnight

🥗 In a large lipped platter, arrange the tofu pieces and blood orange discs. Pour the dressing all over, garnish with sesame seeds, oil and scallion greens. Serve at room temp or chilled (during summer chilled version is too good), Enjoy!

*Note: Feel free to substitute the citrus during summer with peaches or plums