Remy's Ratatouille- My Way
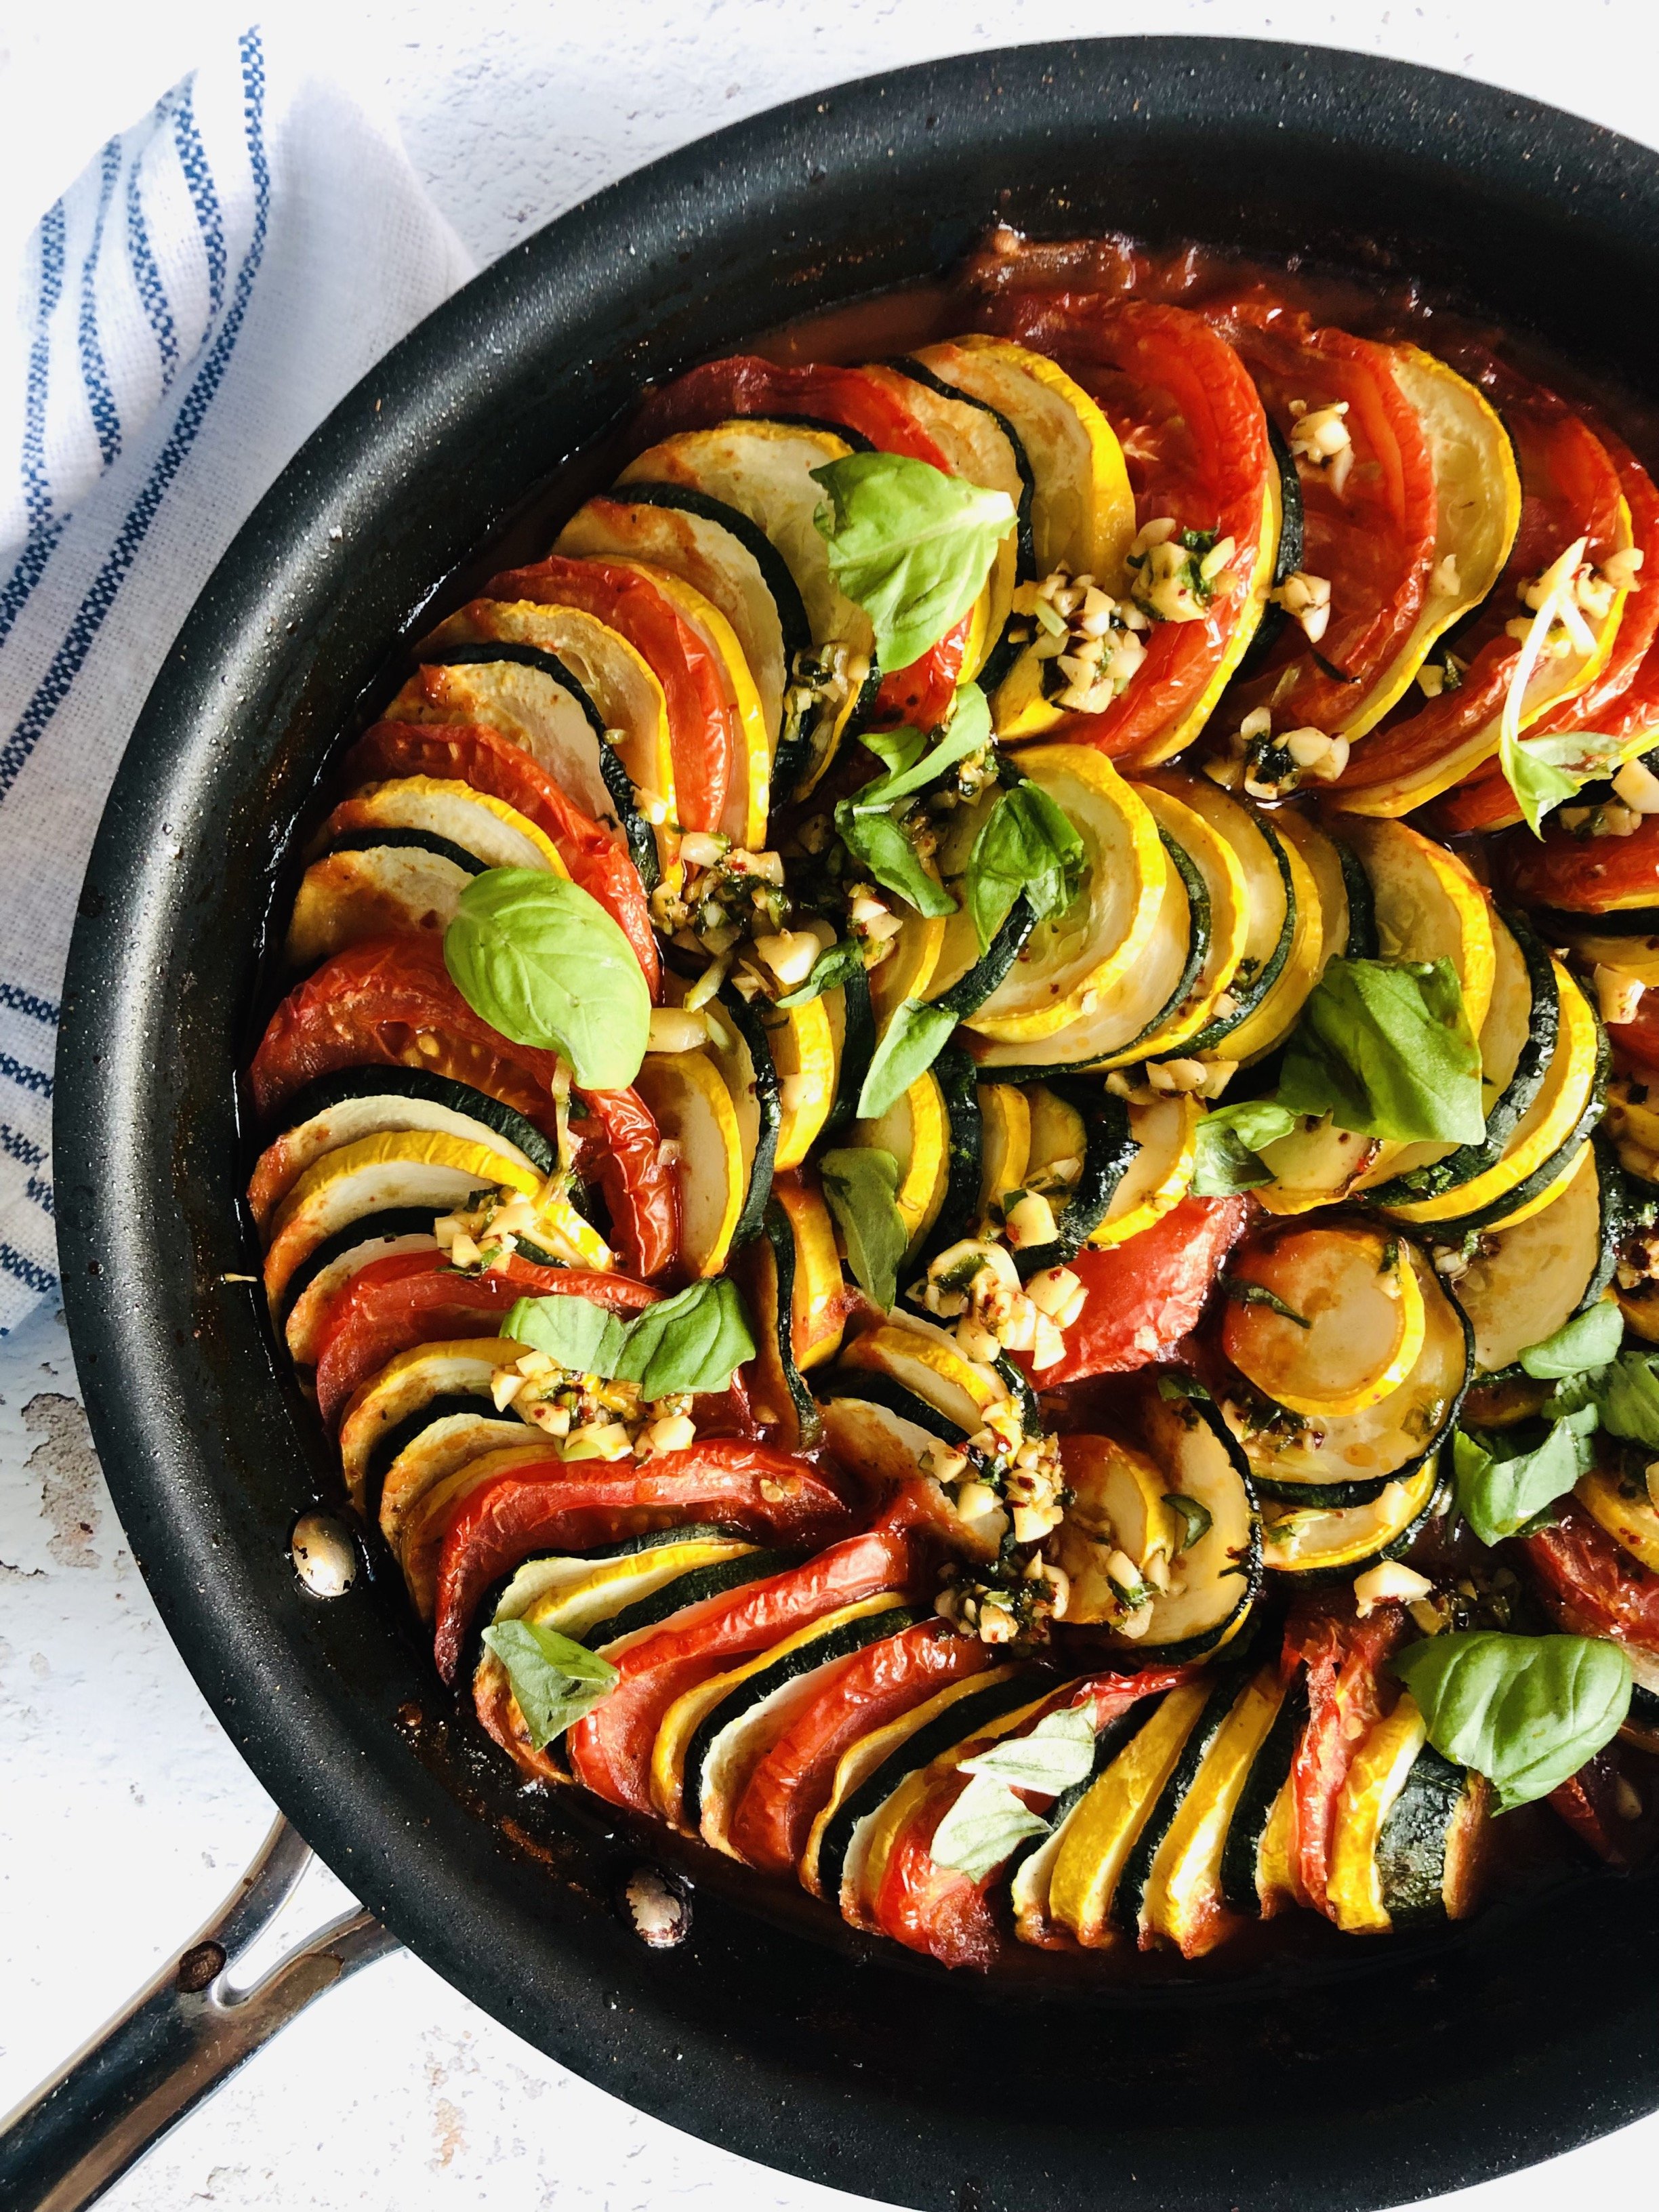
Back in 2019 summer, after watching “Ratatouille” gazillionth time, I made my first ratatouille and I remember vividly when my husband took that first bite of confit summer squashes wrapped in peppery sweet tomato sauce and gasped “This is ridiculous! I think this is your calling, everyone needs to eat this”. It was hard to believe him as it’s such a humble dish. The recipe has evolved a wee-bit since then but the reaction I receive (now my friends too) is exactly the same and believe it or not it still continues to be the most requested dish by my husband…

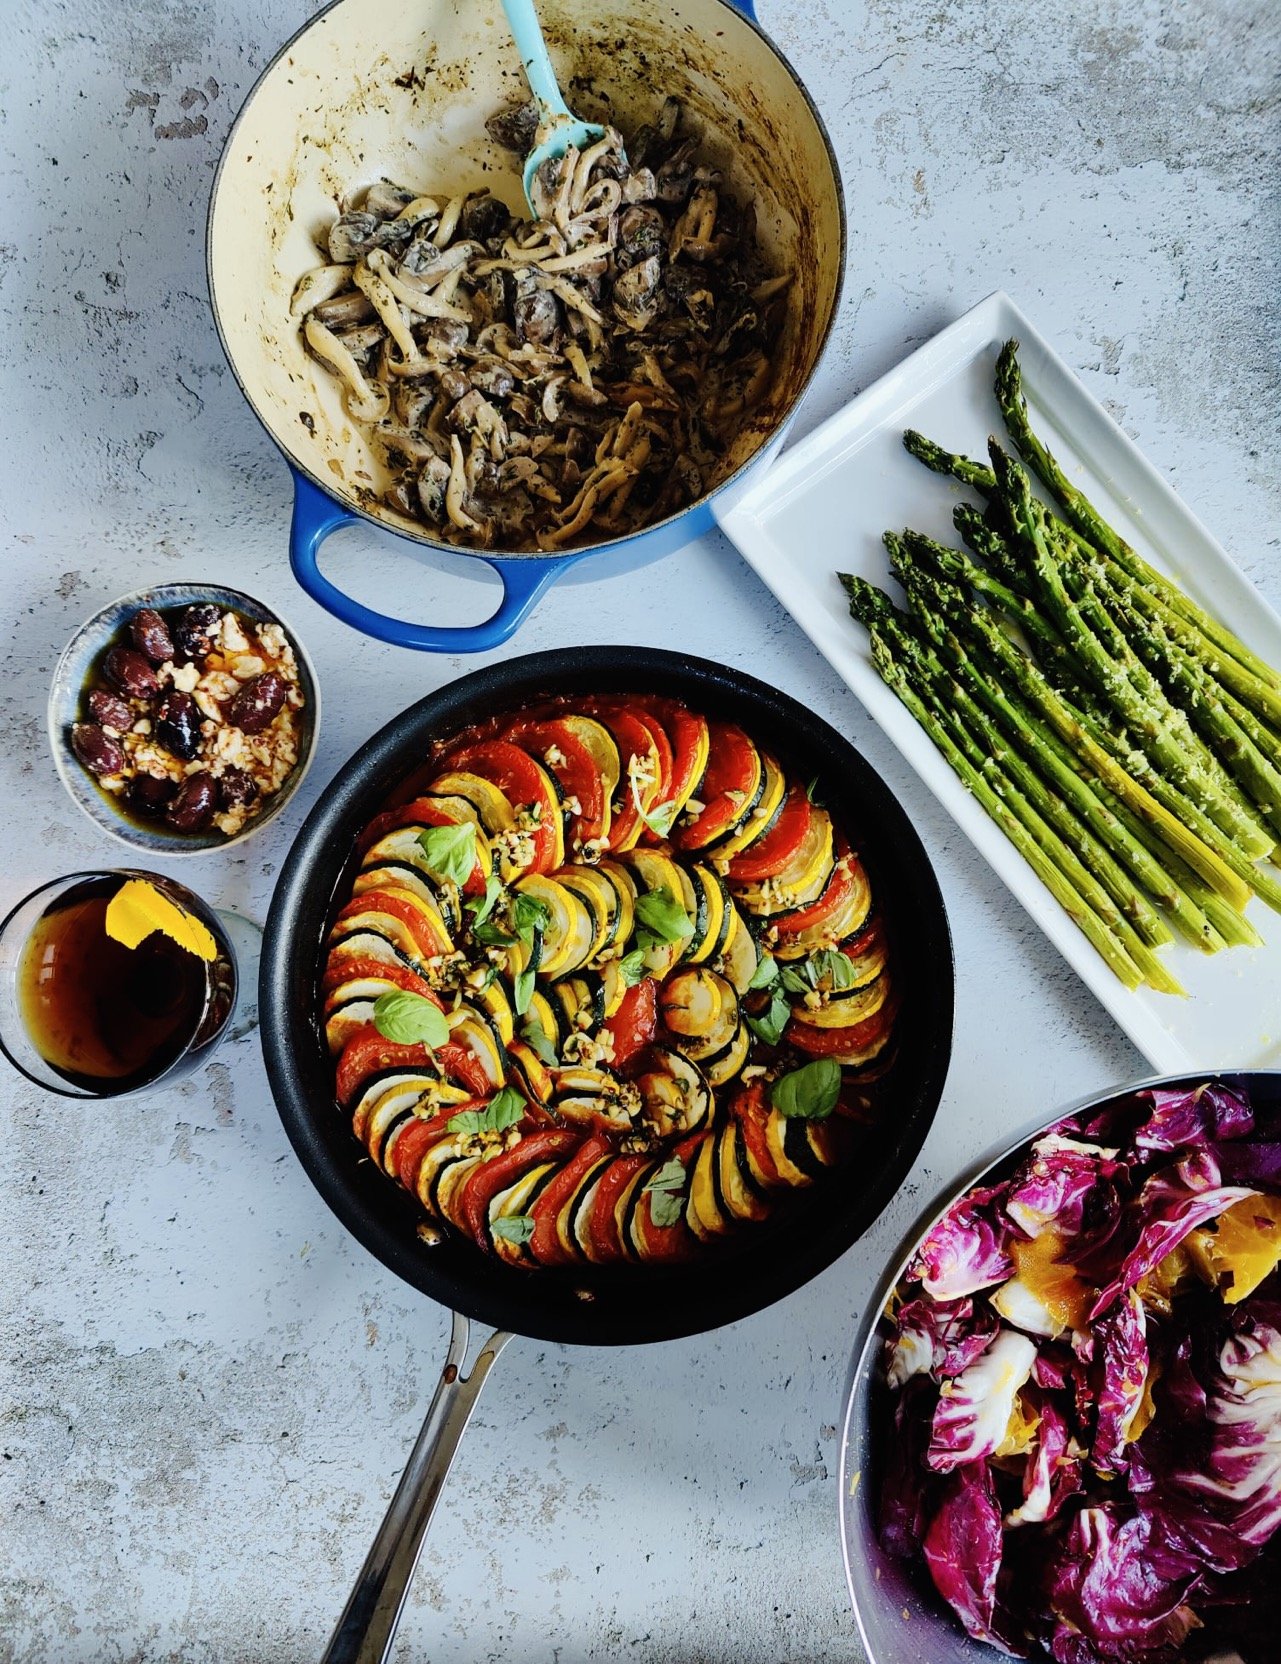
With a bit of planning, its a perfect make ahead dish for a summer dinner party. Make the sauce the night before, arrange the vegetables on top, cover and keep it in the fridge until an hour before your guests are due. Bake and serve right away with some good sourdough or baguettes! Double the recipe to make it in a large 13’ x 9’’ roasting pan / casserole dish. Don’t stress too much about the arrangement or pattern to be perfect, with such vibrant colors and flavors it will be stunning.

*Note: in the second image I have a dinner party spread inspiration with the radicchio and apple salad, seared asparagus with lemon and parmesan, marinated olives and goat’s cheese and pinot grigio sauteed wild mushrooms.


Ingredients (serves 4)
2 Medium Zucchinis, thinly sliced (approximately 1/8” thick)
1 Medium Yellow Summer Squash, thinly sliced (approximately 1/8” thick)
4 Vine or Roma Tomatoes, preferably equal sized and thinly sliced (approximately 1/8” thick)
1/2 tsp Fine Sea Salt
1-2 tsp Extra Virgin Olive Oil

Sauce
1 tbsp Olive Oil
1 Medium Red Onion, thinly sliced
1 Large Red Bell Pepper, oven roasted and chopped or 160g Roasted Red Pepper from Jar, coarsely chopped
1 Large Very Ripe Tomato, skin removed and pulp grated or 240g Canned Crushed Tomato
1 tsp Paprika or Kashmiri Chili Powder
1 tsp Ground Cayenne Pepper or any Hot Pepper Flakes
Heaping 1/2 tsp Ground cumin
210g Canned crushed tomatoes (if not using a fresh large Tomato then just use 454g or 1lb Crushed Tomato from the can)
75ml Vegetable Stock or Water
2 tsp Dried Basil (substitute with dried oregano)
1 tsp Fine Sea Salt

Topping
2 tsp Olive Oil
2 Garlic Cloves, thinly sliced or crushed
1/2 tsp Red Pepper Flakes
1/2 tsp dried Basil or Oregano

Garnish
Fresh Basil or Oregano leaves, whole and torn
Flaky salt & Extra Virgin Olive Oil (Top Quality)


Directions
1. Pre-heat oven to 375F / 190C (175C with Fan). If making the sauce the day before then skip this step until ready to bake. If using a large casserole dish then grease it with Olive Oil and keep it aside. Prep the vegetables at this point (I prefer using a mandoline for uniform thickness, but a sharp knife is fine and slight variation in thickness is fine too), toss the sliced vegetables in 1/4 tsp salt and keep them aside

2. Make the Sauce: heat up oil in a oven safe skillet (if using casserole dish then any 10’ skillet is fine), on medium flame. Add onion, fry for 5 mins then add roasted pepper and continue sautéing for 5 more mins. Add grated tomato (if using crushed tomato from can then add half qty), half of spices and dried herb - cook everything for 4 min. Now add crushed tomatoes (remaining if using entirely crushed tomatoes) and stock/water. Season with salt and bring everything upto vigorous simmer. Turn off the heat now

3. Arrangement: Once the sauce and skillet are cool enough to handle, pat any excess liquid out from the salted vegetables and arrange them in alternating colors on top of the sauce in concentric circles (fan them out to your preference). If using a casserole dish, then transfer the sauce from skillet into the greased casserole dish and arrange the vegetables on top. Drizzle 1-2 tsp oil and sprinkle remaining 1/4 tsp salt. Cover and bake in the oven for 42-45 mins and then uncovered for 20 mins. (If making ahead then just cover and refrigerate until 90 mins before serving, pre-heat oven to the recommended temperature and bake as per instructions)

4. Serving: Just before serving, combine first topping ingredients in a heat safe bowl and microwave for 1 minute in 30 second bursts. Pour the topping on top of ratatouille, garnish with fresh herbs, pepper flakes, a bit of flaky salt and a generous drizzle of very good quality Extra Virgin Olive Oil on top. Enjoy!

*It tastes much better the next day so making a big batch to ensure leftovers is a great idea

Not Your Average Bruschetta

Warning: Lots of scandalous switch-ups and additions here! I have loved bruschetta all my life as it has three of my most favorite things in whole wide world - fresh tomatoes, cheese and a solid crusty bread. Hence, I’m quite particular about maintaining the purity of the classic while upping the umami game. The aromatic dressing is what makes it unique, feel free to re-purpose it in other summer salads too! Skip the bread, put a burrata on a bed of these dressed up tomatoes and you have a reimagined caprese salad. As you can sense from my pushy tone, this summer I urge you to make this at least once.

*Note: The quality of ingredients is truly what differentiates an exemplary bruschetta from a regular one, so make sure to use top quality oil, good seasonal toms, fresh herbs (instead of dried bottles ones) and of course a nice baguette or sourdough with a satisfying chew!


Ingredients (makes enough for 8-10 pieces)

Dressing

2 Garlic Cloves, crushed

3 tbsp Fresh Oregano Leaves, coarsely chopped

1/2 tbsp Fennel Seeds, toasted and crushed

1 tsp Ground Allspice Berries

1 tsp Coriander seeds, toasted and crushed

1 tsp Hot pepper Flakes, more to finish

2.5 tbsp Olive Oil

1/2 tbsp Lemon Zest

1 tbsp Lemon Juice

1/2 tsp Brown Sugar

Pinch of Fine Sea Salt

Tomato Prep

350-370g (about 2 cups) mix of Cherry and Heirloom Tomatoes, diced

8-10g Sweet Basil Leaves, finely chopped

1.5 tsp BalsamicVinegar

1/4 tsp Fine Sea Salt

40g combination of Grated Parmesan and Gruyère in your preferred ratio (if you don’t find Gruyère or looking for a pasteurized cheese alternative then you can use Fontina or Emmental or else you can just use 40g good quality Parmesan)

8-10 Slices of Baguettes (the ones here in photo are from Middlebrow Bakery)

Couple tablespoons of Olive Oil for Toasting


Directions

🍅 In a small heatproof bowl - combine garlic, chopped oregano leaves, fennel, allspice berries, coriander and hot pepper flakes. Microwave Olive Oil for 2 mins (or until shimmering) in 30 sec bursts, then immediately pour the oil into bowl. Give everything a good mix and let it come to room temperature. Then add lemon zest, lemon juice, salt and sugar into the aromatic oil, give it a good mix. Keep it aside for at least 15 mins so that the flavors meld properly

🍅 In a medium bowl, combine tomatoes, basil, vinegar, salt and cheeses. Transfer the cooled aromatic oil into this bowl and mix gently until everything is well combined. Adjust seasoning if required

🍅 Heat up a skillet (preferably a cast iron one), brush the baguette slices with some olive oil, and lightly toast in batches (avoid over crowding the pan). Spoon the dressed tomato mixture on each toast and finish with more hot pepper flakes (optional). Serve some really good quality extra virgin olive oil on the side so that whoever wants the oomph can drizzle some on top before popping one into their mouth.

*Skip the cheese or use Vegan alternative to Parmesan to keep this Vegan

Winter Ratatouille

French summer classic gets a seasonal makeover. Here I have wintertime staples such as squashes, purple sweet potatoes, beetroot, carrots and apples - all thinly sliced and fanned out on a luxurious sauce that can be easily veganized. And the finishing touch of maple butter glaze with crispy herb is an absolute must. Whether it’s a special occasion or a dinner party this one will definitely get you all the “oohs” and “aahs” and the bonus is kids will love it too (as long as you don’t reveal the list of veggies).

I love to serve it with lightly toasted tortillas, so that everyone can dig in and make their own wrap with the ratatouille. And this Citrus Salad goes really well with this one.


Ingredients (serves 4-6 as side)

2 tbsp Salted butter (substitute with Olive Oil to keep it Vegan)
170g Leek Whites or the edible portion, thinly sliced
3 Garlic Cloves, chopped

1” Ginger Piece, peeled and grated
1/2 tsp Ground Allspice Berries (substitute with Ground Cinnamon)
1/2-3/4 tsp Ground Nutmeg (adjust to your taste / preference)
1/2 tsp Fine Sea Salt
2-3 Sprigs of Thyme
2 sprigs of Tarragon (substitute with Sage), discard stems and separate the leaves. Chop up the leaves coarsely
150ml Vegetable Stock (substitute with Water)
85g Crème Fraîche (substitute with Sour Cream or Vegan Cream Cheese)
25g Grated Gruyere or Cheddar Cheese (substitute with Vegan Cheddar)
1 tsp crushed White Pepper (black or pink pepper will work too)

Veggie Prep (everything should be thinly sliced into 3mm half moons)
2-3 Apples (preferably Pink Lady or Golden Delicious / Gala Varities)
2-3 Small Sweet Potatoes (Orange or Purple variety)
2 Medium Beets
1/2 of a Small Butternut Squash
1/2 of a Small Delicata Squash
1 + 1/2 tbsp Olive Oil
1/2 tsp Salt
2 sprigs of Thyme

Glaze
1.5 tbsp Unsalted Butter (substitute with Vegan Butter)
1 tsp Maple Syrup

1/2 tsp Apple Cider Vinegar
1/2 tsp Crushed White Pepper (black or pink pepper)
10-12 Fresh Tarragon or Sage Leaves


Directions

  1. Finish the Veggie Prep: Combine 1 tbsp Olive Oil (reserving 1/2 tbsp) with all veggie prep ingredients in a large bowl. Toss really well until everything is coated in oil, salt and thyme

  2. Make the sauce: In a 10” oven proof skillet (if you don’t have one then use a regular skillet and use a 10” Round baking tin later) add butter, leeks, ginger and garlic. On medium flame continue frying until they start sweating and smelling aromatic (about 4 mins or so). Then add dry spices and cook for 2 minutes; now add chopped tarragon leaves and stock. Give it a good mix and increase the heat to bring to vigorous simmer - once simmering cook it for 5 mins and turn off the heat. Pre-heat oven to 375F. Once cool enough, transfer into blender, add crème fraîche and cheese. Whiz until it’s a smooth sauce like consistency

  3. Arrange and bake: Transfer 3/4 sauce back to the oven-proof skillet or a round cake tin. Swirl the skillet/tin so that a layer is formed in the base then start arranging the seasoned slices of vegetables from the large bowl. I prefer to create a set of different colored slices (example: 1 slice of Apple, 1 slice of carrot, 1 slice of Delicata, 1 slice of Beet, 1 slice of Purple Sweet Potato and 1 slice of Butternut Squash), then repeat the pattern. Even if it’s haphazard it will still look fabulous due to the stunning natural colors of all vegetables. I try to stuff in a lot more vegetables as they shrink a lot while baking so don’t be afraid to squish and overlap. If there are leftover vegetables, then lay them over on a parchment lined baking sheet and bake them on a separate rack until golden and cooked. Those will be amazing for another dinner. Now, pour the remaining sauce on top of arranged vegetables finish with 1/2 tbsp Olive Oil and crushed white pepper. Cover with an aluminum foil and bake for 30 mins and uncover, increase the temperature to 400F and bake for another 20-25 mins or until the veggies look caramelized and when poked with a fork, they are tender

  4. Serve: When ready to serve, heat up butter in a small pan. Once sizzling, add tarragon or sage leaves. Fry until crisp, fish out the leaves and let the butter cool a bit. Now whisk, maple syrup and the aromatic butter into a glaze. Brush the ratatouille with the glaze and decorate with crispy tarragon or sage leaves. Enjoy!

*Note: if you have a cast iron Dutch oven or braiser with a lid then it will be perfect to use here

Crispy Taro Cake Bowl

Whether it was the influence of several friends and colleagues being Chinese, Vietnamese, Korean and Taiwanese or just my very deep-rooted love for the flavors from East Asia - we celebrate Lunar New Year every year. Other than making Nian Gao (the New Year cake) from scratch we do try to make most of the traditional dishes such as dumplings, hand-pulled noodles, pickled veggies, turnip and taro cakes. Along with some non-traditional ones such as Baozi or Gua Bao, Steamed Eggs, Rice Paper Rolls, Wontons, etc. The spirit of eating a lot of food with friends and family being intact!

For this year’s celebrations, I made this salad with leftover Taro Cake pieces and was a massive hit at the party! I made the cakes from scratch but you can find them in specialty stores such as H-mart or Park to Shop. If not then, substitute with Tteok or Tofu for similar textural delight or else go with boiled baby potatoes or cauliflower florets. Add some chopped up omelette or boiled eggs for extra richness. Gong Xi Fa Chai!


Ingredients (serves 2 as Main)

Vegetable Base

2 Persian Cucumbers, de-seeded and cut into 2” chunks. Salted and drained after 10 mins
2 Baby Carrots, thinly sliced into batons
1 Celery, cleaned & thinly sliced (optional)
1/2 Jalapeño, thinly sliced
1 small garlic, crushed
1 tsp Chili Oil (Homemade or Lao Gan Ma)
1 tsp light Soy Sauce (substitute with Tamari or Coco Aminos based on your dietary preferences)
1/2 tsp Granulated Sugar
1/2 tsp Doubanjiang or Fermented Broad Bean Paste(optional but highly recommended)

Sauce
2 tbsp Neutral Oil
4 Scallions, finely chopped (Handful greens Reserved)
4 garlic cloves, finely chopped
1 tsp Ground Coriander
1/2 tsp Chinese 5 spice powder

1 tsp Brown Sugar or Agave or Maple Syrup
1 tbsp Dark Soy Sauce (substitute with Tamari or Coco Aminos based on your dietary preferences)
2 tsp Black Vinegar (substitute with equal parts of Balsamic and any White Vinegar)

10-12 pieces of rectangular Taro Cakes, cooked (substitute with 100-120g sliced rice cakes/Tteok or soft tofu)

12g Cilantro, roughly chopped (substitute with basil)
1 tsp Black Roasted Sesame Seeds
1 tsp White Roasted Sesame Seeds


Directions
🧧 In a large bowl, combine all vegetable base ingredients and mix thoroughly. Keep it aside for 15-30 mins or while you prep rest.

🧧 In a non stick skillet - add oil, scallions, garlic and spices. Turn on heat on the lowest setting/flame. Fry the aromatics until they begin to color and become very aromatic (about 4-5 mins on low flame). Fish out the fried aromatics into a small bowl and increase the heat to medium.

🧧 Now gently fry the cooked Taro cakes or any of the substitutes until golden and crisp on both sides. Be patient for this step as it will take about 15-20 mins of attentive frying - but when you achieve that crisp exterior and jelly like soft n chewy interior it will be all worth it! If using rice cakes, then it will be much faster but keep an eye as it’s easy to over cook and make it rubbery. If using tofu, then gently coat with some cornstarch (about 1 tbsp). Adjust the timing if using Potatoes or Cauliflower. Once fried, transfer the Taro cakes to a paper towel lined plate to get off any excess oil

🧧 Now add rest of the sauce ingredients to the bowl with fried aromatics. Give it a good mix and transfer into the large bowl with vegetables. Transfer the crisp Taro cakes into the large bowl, add fresh cilantro, give everything a gentle mix and let the flavors meld for 15 mins

🧧 Divide into serving bowls, finish with roasted sesame seeds. Enjoy!

Harissa Kabocha Squash Mascarpone Flatbread with Fixings

Don’t want to make dough from scratch but want to serve a party pleaser centerpiece that’s not charcuterie? I got you! Here’s an impressive flatbread utilizing generic store-bought pizza dough with fixings that add legit drama. The pizza dough come in quite handy for a dinner party or a busy workday lunch - amazing canvas to use up leftovers too.

I got my favorite kabocha squash - the texture is quite unique, and I usually use it in stews and making desserts but this season I have been hooked to roasting with harissa and employing as a pizza topping. Its quite delish and satiating.

The herb paste and pickled radish are an absolute must! I like to serve it with a Turkish Chile Pepper (Pul Biber) and grated garlic infused olive oil but feel free to serve with any chili oil that you like!


Ingredients (Serves 4)

1lb store bought Pizza dough (I used from Trader Joe’s)

Harissa Squash
350g Kabocha Squash, sliced into 1/8” thick half moons (substitute with any winter squash) - I like to keep the skin on for the texture but you can totally peel it off and bake
1/2 tbsp Tomato Paste
1-2 tbsp Harissa Paste (adjust based on the type and your spice tolerance - if using Mild variety then you can use upto 2 tbsp)
2 tbsp Neutral or Avocado Oil
1.5 tbsp Soy Sauce
1 tbsp Mirin

Fried Aromatics
1 trimmed Leek, only edible white & light green portion - sliced into 1/2” thick half moons
2-3 Small Breakfast Radish
4 garlic cloves, smashed and roughly chopped
2 tsp Neutral Oil
1 tsp Harissa Paste

Mascarpone Mix
110g Mascarpone, Room temp
50g Greek Yoghurt
1 tbsp dried Mint
1/2-1 tsp Salt
1 tsp Ground Black Pepper

Herb Paste

10-12g Mix of Fresh Cilantro and Mint leaves
20g Roasted Pumpkin Seeds
2 tbsp Lemon Juice
1 tbsp Lemon Zest (optional)
1.5 tbsp Chili Oil or Extra Virgin Olive Oil (for less heat)

Pickled Radish

4 Breakfast Radish, thinly sliced
2 tbsp Lemon Juice
Pinch of Sugar

1-2 tsp Olive Oil to finish (optional)


Directions
💥 Bring the pizza dough to room temperature. Oil a 13”x9” baking sheet, line with parchment and lightly grease with oil. With wet hands, transfer the pizza dough on to the sheet and fold one side of the dough to the middle and repeat with other side (think folding a paper into thirds). Now pinch the ends that meet in the middle and flip so that seam side is down and smooth side is up. Cover with an inverted tray or put in a large plastic bag to tie like a balloon and let it rise until it fills the pan completely (may take upto 3 hrs)

💥 Pre-heat oven to 420F and line a large baking sheet with parchment or aluminum foil. In a large bowl, combine all Harissa Squash ingredients and give it a good mix. All slices should be well slathered. Arrange the slices on the lined sheet and bake for 20-25 mins or until golden & cooked through. Increase the oven temp to 435F

💥 While squash is in the oven, heat up oil in a skillet and on low flame fry leeks and radish with garlic and harissa paste for 4-5 mins. Keep the fried aromatics on side. Combine and whisk all mascarpone mix ingredients into a smooth paste. In a small bowl, combine all pickled radish ingredients and leave it to pickle for 15-20 mins

💥Dimple the risen dough, spread the mascarpone mix on top, arrange Roasted squash wedges and scatter fried aromatics. Drizzle 1-2 tsp Olive Oil (optional) and bake for 25 mins or until golden with crisp bottom. Meanwhile, blitz all herb paste ingredients and keep it aside

💥 Plop spoonful of herb paste all over on the flatbread, scatter pickled radish and serve warm or room temperature. Enjoy!

Saffron Roasted Cauliflower and Peppers in Caper Dressing

We all have a handful of recipes that we can whip up our eyes closed - this super easy tray bake falls into that category. Comprising all my go to pantry essentials and including my favorite spice “saffron” - this one is a winner anytime of the year! Make sure to use only Golden Raisins (bear with me even if you don’t like Raisins) in the dressing and by swapping the butter with oil you can adapt it to vegan dietary restriction. Since the saffron is included in the cooking medium, therefore you don’t need a very high quality or imported Persian Saffron - reserve that for no bake desserts!


Ingredients (Serves 4 as a side)

1 head of Medium Cauliflower, leaves intact & cut into quarters. Blanched for 60-90 seconds in boiling salted water

1 large Red Onion, quartered & cut into big chunks

8 mini Sweet Peppers, whole with a slit

4 Garlic Cloves, crushed

1 tsp ground Cumin Seeds

1 tsp ground Cayenne pepper (substitute with mild chile flakes for less heat)

1/4 tsp Fine Sea Salt

1 tsp Brown Sugar

Saffron Butter

4 tbsp Unsalted Butter (to keep it vegan substitute 1:1 with Olive Oil)

1 tsp saffron threads

1 tsp sea salt

Capers Dressing

4 tbsp drained capers, patted dry & finely chopped

12g flat leaf parsley, stem discarded and finely chopped

12g chives, finely chopped

2 tbsp white wine vinegar

2 tbsp Extra Virgin Olive Oil (EVOO)

1 tbsp lemon juice

1 tbsp lemon zest

45-48g Golden Raisins (if you are dead set on not using raisins then swap with same quantity of Turkish style Dried Apricots)

1.5 tbsp Orange Juice (OJ)

Pinch of salt


Directions

💥 To make the saffron butter - combine saffron threads & salt then crush them into powder. Heat up butter, once shimmering add saffron-salt mix & cook on low flame for 3 mins. Then let it steep for at least 1 hour to overnight

💥 Pre-heat oven to 400F, then combine first 8 ingredients in a large roasting pan (I use a 13”x9” casserole pan). Transfer the saffron butter & mix until everything is well coated. Bake for 40 mins or until cooked and golden

💥 Meanwhile in a small heatproof bowl add raisins and OJ. Microwave on high power for 30 secs, let it sit for 15-20 mins. Roughly chop up the raisins and throw it back into the bowl. Add rest of the dressing ingredients into the bowl and mix everything. Once the vegetables are out of oven, let it cool for 2-3 mins then generously scatter caper dressing into the roasting pan. Give it a toss and serve right away!


Miso Pumpkin Mini Cakes with Kahlúa Tahini Sauce

May sound a bit too dramatic, but the whole flavor combo works! These dainty little cakes with an umami spark from the Shiro Miso in the Genoise Sponge and the delicious boozy kick from the Kahlua in the rich Tahini Sauce are very easy to put together. A true delight for all my fellow sesame lovers.

*If you don’t have mini Bundt pans then mini muffin or madeleine pans are perfect. Additionally, these can be refrigerated in an air-tight container upto 3 days - just bring it to room temperature before serving.


Makes 10-12 Mini Cakes

Wet Ingredients
70g Unsalted Butter, melted
36g Pumpkin Purée
16g White Miso Paste
2 large Eggs (100g)
36g Granulated Sugar
25g Maple Syrup
1 tsp Vanilla Bean Paste or Extract
1/2 tbsp Orange Zest

Dry ingredients
85g Plain Flour
11g Cornstarch
3/4 tsp Baking Powder
Scant 1/2 tsp Ground Turmeric
1-2g Ground Cardamom (upto taste)

Kahlúa Sauce
40g Tahini (the tahini I used is quite thick so increase the quantity if your’s is runnier)
75g Maple Syrup
8g Dutch Processed or Black Cocoa Powder
2g Instant Espresso Powder or Instant Coffee Powder
1 tsp Vanilla Extract
3 tbsp Kahlúa Or Coffee Liquer (more to adjust the consistency)

*Sesame Brittle (Optional)

In a saucepan, melt 100g granulated sugar with 2 tbsp water until it turns amber colored caramel. Now add 1 tsp Pure Vanilla Extract, 27g of roasted sesame seeds (both black & white) & 1g sea salt - stir until well combined. Spread this mixture evenly on a silicone mat, let it set for 15-20 mins. Break into different shapes & keep it ready to use in desserts or as candy snacks

Roasted Sesame seeds or Crushed Sesame Brittle for garnish

Directions
🧡 Sift and whisk all dry ingredients in a bowl. Keep it aside. Whisk melted butter, miso and pumpkin purée and keep it aside

🧡 Pre-heat oven to 375F. In a large bowl, whisk eggs, zest and sugar vigorously for 5 mins or until it begins to start turning pale & frothy. Add maple syrup and vanilla and continue whisking until it reaches ribbon stage or very frothy

🧡 Now fold 1/3 dry ingredients mixture into the large bowl with beaten eggs mixture. Once fully incorporated, add 1/3 pumpkin Miso butter and continue folding until everything is homogenous. Continue this alternate dry and wet additions twice until a well mixed (with no dry floury spots) batter is achieved

🧡 Grease a 12 hole mini Bundt or cake pan with cooking spray or melted butter. Fill each hole 2/3 level and bake in the middle rack for 10 mins. Let it cool in the pan for 8 mins then invert to release the cakes. Let them cool completely

🧡 Whisk all sauce ingredients until thick, glossy and smooth. We are looking for a thick drip glaze - so based on the quality of Tahini, Maple Syrup and Liquer please adjust the quantities to achieve the desired consistency. While the cakes are on cooling rack, put a baking sheet or parchment underneath. Generously drizzle about 2 tsp sauce on top of each cake, let it drip and set for 5 mins or so. Finish with roasted sesame seeds or blitz the optional sesame brittle to resemble praline and sprinkle on top.


Blistered Green Beans with Garlicky Sesame Dressing

I’m a huge fan of green bean casseroles on Thanksgiving table, so obviously I had to bring in my umami game for my dream holiday spread! Loosely based on the classic Sichuan cooking style for Green Beans here I have blistered beans with fried garlic and chile infused soy-sesame oil dressing. A very few humble ingredients come together to make this ridiculously addictive side that I guarantee you won’t make just once!


Ingredients (serves 4-5 as a side)
1 lb Green Beans, de-stringed & whole
2 tbsp Sunflower Oil (sub any neutral oil)
Pinch of salt

Dressing
1.5 tbsp toasted sesame oil
12 Fat Garlic Cloves, whole & lightly crushed by blunt edge of knife
1 small Jalapeño (or Fresno), thinly sliced into discs
1.5 tbsp Soy Sauce (use Tamari to keep it GF & Coco Aminos to keep it Soy-free)
1 tsp Black Vinegar (even though it won’t be the same substitute 1/2 tsp Rice Vinegar + 1/2 tsp Balsamic Vinegar)
3 tbsp finely chopped Chinese Chives (substitute with 2 scallions)

1/2 tbsp Toasted Sesame seeds for garnish

Directions

💥Combine first 3 Dressing ingredients in a small pan. On medium flame, fry for 4 mins or until light golden. Turn-off heat, add soy sauce, chives & vinegar to the pan. Give everything a good mix & let it sit for 15-20 mins

💥Heat up sunflower oil in a large skillet, arrange all beans in a single layer (do it in batches if using small pan to avoid overcrowding). Let it cook on high heat for 3 mins UNDISTURBED. Now flip the beans, add salt & fry on medium-high flame for 4-5 mins. All should look blistered with brown spots & the texture will be slightly soft with a bite

💥Transfer beans into a large serving platter. Pour the dressing & toss until beans are well coated. Let the flavors meld for at least 10 mins

💥Scatter toasted sesame seeds on top & serve right away. I typically serve it with some steamed Jasmine Rice & Mapo Tofu!